CaptureKey is an Android app that ingests photos from a tethered camera during events, tags each photo with the assignment it belongs to (for example, a suite or table), runs on-device quality checks, and uploads everything to the server while keeping the whole team in sync.
You shoot with the camera as usual. CaptureKey listens over USB, pulls every new photo to the phone, checks it for blinks, soft focus, and exposure problems, and automatically tags it with your currently active assignment. When you complete an assignment, its photos are uploaded for processing/printing.
Try it before the event
The Interactive Demo is a working simulation of the app in your browser — no camera or account needed. Take the ~10 minute guided tour of a full session (login → event → assignment → photos → quality → complete → upload → end session), then break things freely in sandbox mode.
The two questions the app is always asking about photos
Which assignment does it belong to? (tag)
Should it process/print? (print flag)
They are independent. A photo can upload perfectly and still be marked Don't Print — that's normal for marker photos and test frames. See What Prints.
1234567891011
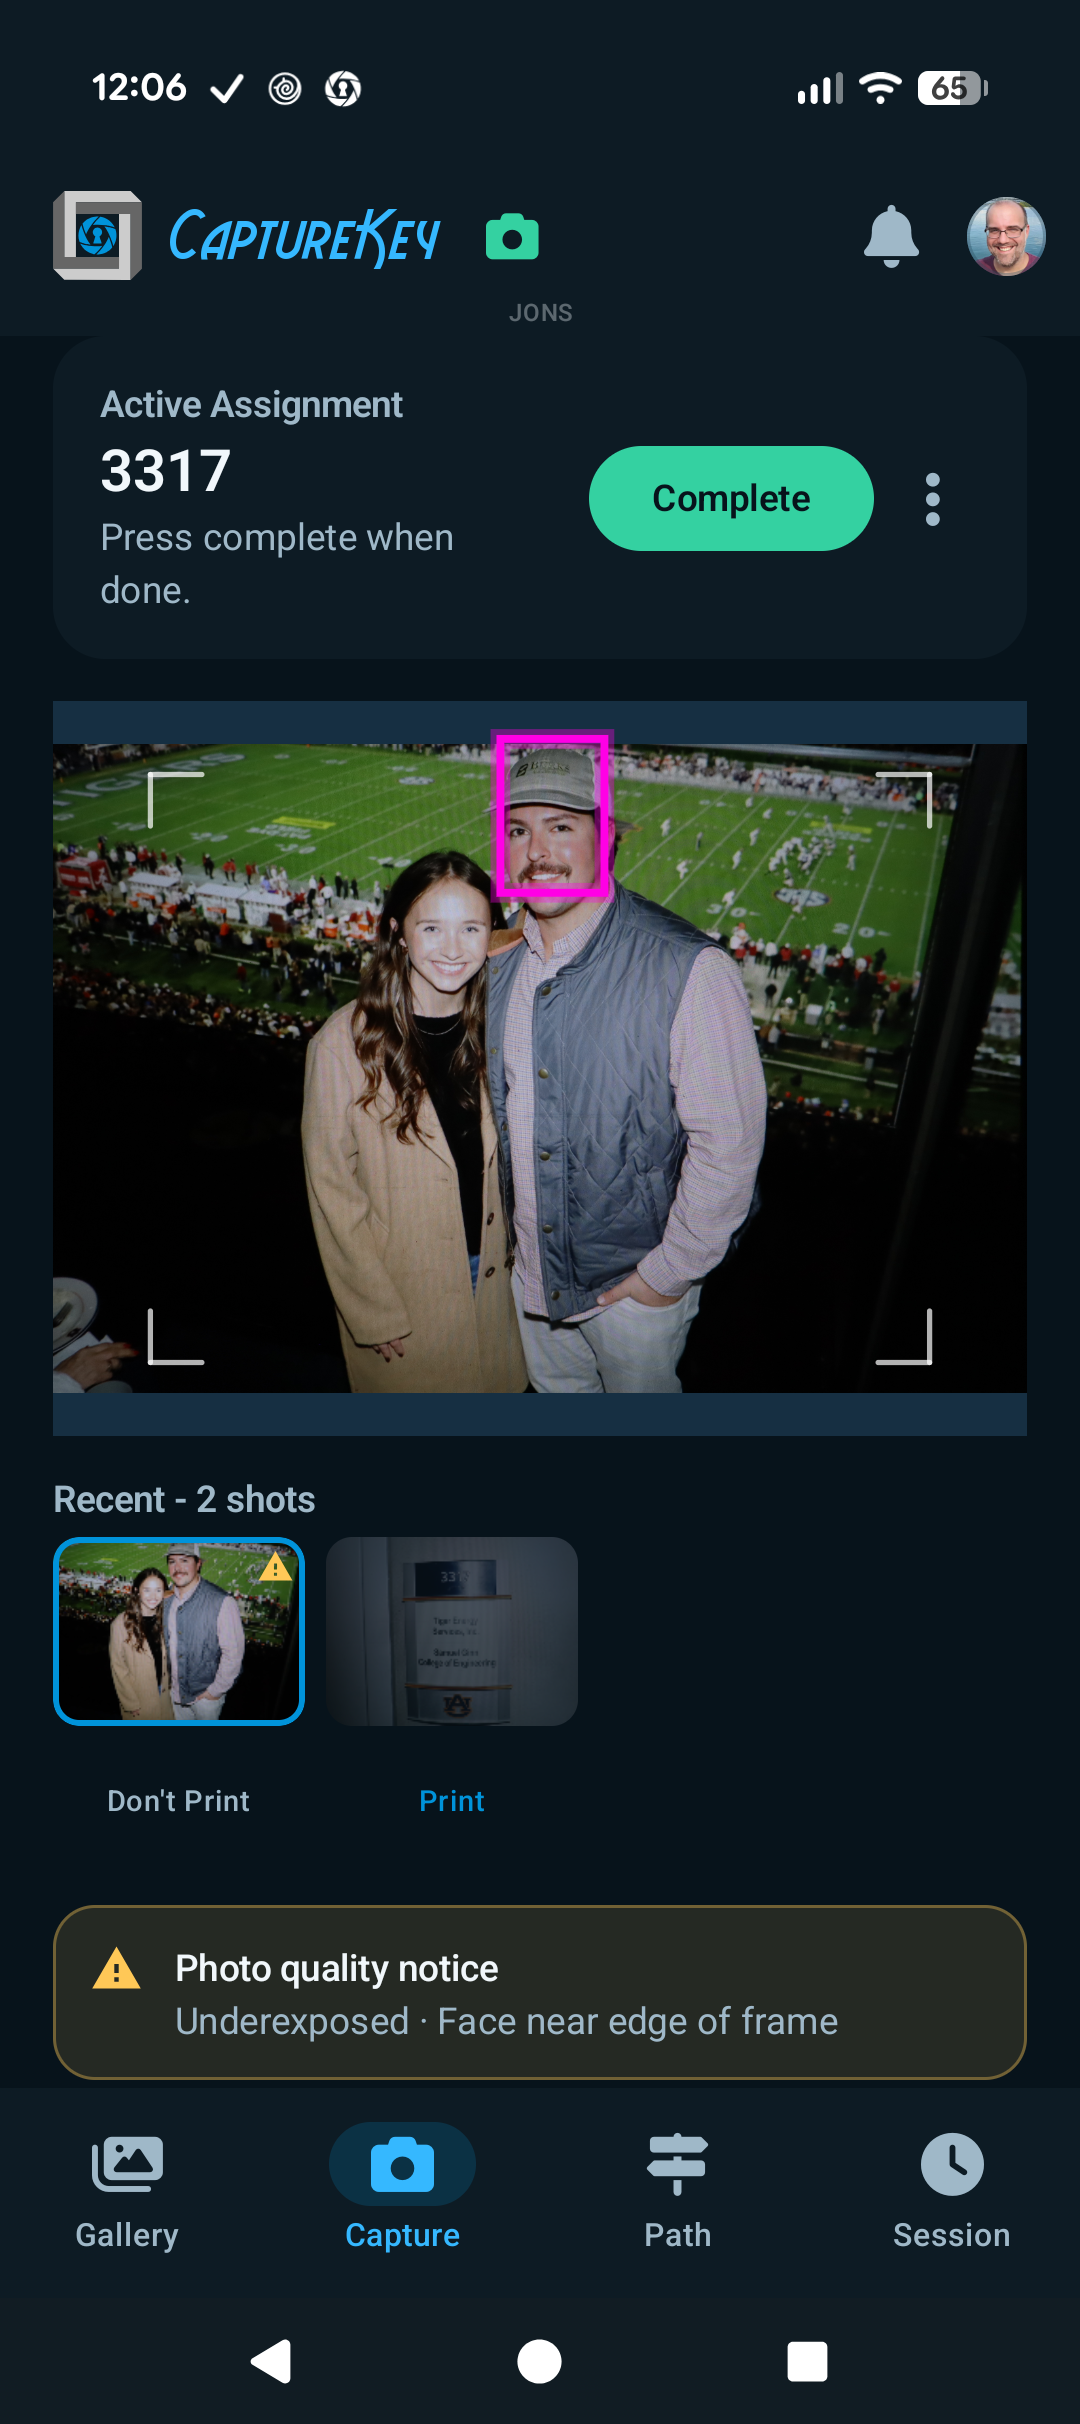
Logo - Tap the CaptureKey logo to open the About dialog: app version and a Check for Updates button. See App Updates.
Camera Status - Camera icon colored by connection state: green = listening for captures, amber = connecting or disconnecting, red = disconnected. Tap it to jump to the camera card on the Session tab. An amber clock icon may appear if the camera's clock doesn't match the phone's. Tap to view the phone's clock and set the camera to match.
Camera Battery - Camera battery level: green = fully charged, amber = partially charged, red = low battery.
Notifications Bell - Messages, return requests, and system notices land here. A badge counts unread items and the bell pulses and rocks while anything is unread. See Notifications & Messages.
User Menu - Your profile picture. Opens a menu with Event Notes, Import Photos (when an event session is active), End Session, Help (opens this manual), Settings, Scan Login QR, and Logout.
SMID Readout - The device's SMID in small text under the top bar, always visible. See SMID.
Active Assignment Card - Shows the assignment new photos will be tagged with. Complete finishes it (and jumps to Path); Select appears when nothing is active.
Photo Preview - The selected or newest photo, with crop guides and face boxes overlaid when enabled. Tap for fullscreen (pinch to zoom); long-press and drag left to delete. While a photo is coming off the camera, a status banner sits over the preview - see Capture Tab.
Recent Strip - A filmstrip of your last several shots in this assignment, each with a chip underneath reading Will Print or Won't Print. One tap flips it. See Marking Photos Don't Print.
Action buttons - Specific actions that can be applied to the selected photo.
Bottom Tabs - Gallery · Capture · Path · Session. Tap a tab or swipe left/right between pages. The Android back button walks back through your page history.
Getting Started
Install & Permissions
CaptureKey is distributed through PortalKey under Software. Install the APK the same way you install other Shatterproof Android apps; after the first install, the app keeps itself current through its built-in update check. On first launch, Android will prompt for:
Notifications - Allow these. They carry messages from Operations and other photographers, and they power the persistent SMID notification.
USB access - Requested each time a camera is attached. Check Always allow / Use by default on the dialog so it doesn't pop up mid-event.
Sign In
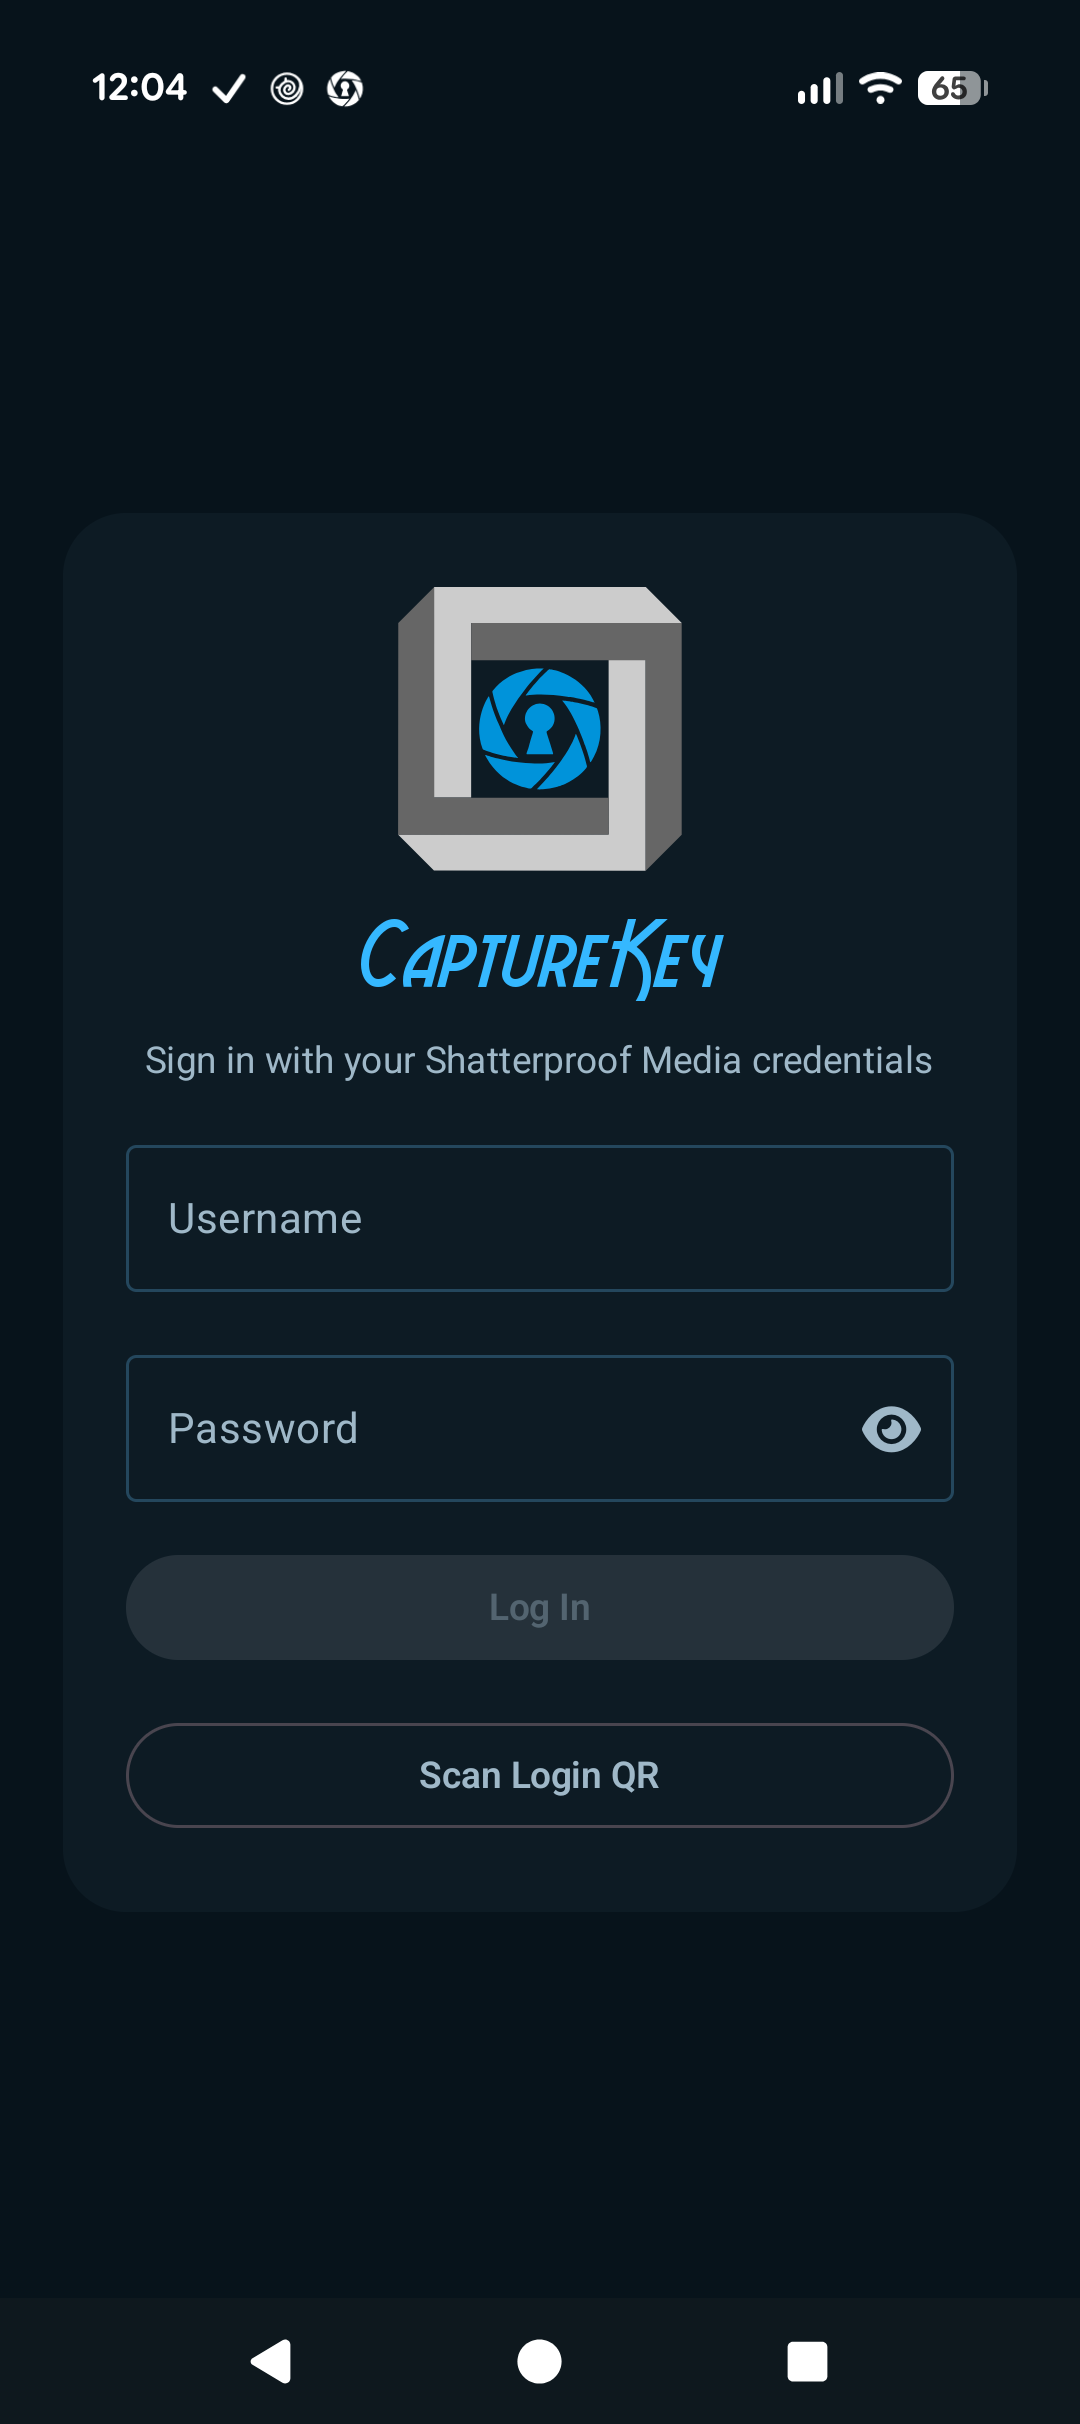
If you aren't signed in, the app opens directly to the login screen.
12
There are two ways in:
Username & password - Your normal Shatterproof Media (PortalKey) credentials.
Scan Login QR - Scans a one-time login code generated for you in PathKey by an admin. Each code works once and expires, and it can carry the event you're scheduled for so the app lands directly in it. Handy for handing a pre-staged phone to a photographer without typing a password.
Your session is remembered until it expires, so you can close and reopen the app without signing in again. A login also triggers an immediate update check.
Scanning a QR while someone else is signed in
Scanning a login QR from the user menu while another account is active shows a Replace Current User? warning — confirming replaces the signed-in user, and that user's unsynced local changes may be abandoned. Finish or end the previous session first when possible.
Pick an Event
Each event is its own sandbox. Assignments, photos, messages, and notes from one event never leak into another, and a device is attached to one event at a time.
After sign-in the app resolves your event in this order:
The event this device was already using (survives app restarts and sign-outs).
The event suggested by the server — the active event nearest to now that you're on the roster for — or the event embedded in your login QR.
Otherwise, nothing loads until you pick one yourself.
To pick or switch manually, go to Session and tap Choose Event / Change Event. You only see events you're rostered on or have assignments in.
If a photo imports while no event is loaded, the app forces the event picker open so the photo can be filed correctly.
Connect the Camera
CaptureKey tethers directly to cameras via USB.
Plug the USB cable into the camera and phone, then turn the camera on.
When Android asks which app should handle the USB device, pick CaptureKey and check Use by default.
The app starts a tether session; if it doesn't, open Session, expand the Camera card, and tap Connect.
The camera icon in the top bar turns green ("Listening") within a few seconds.
Trigger a test shot. It should appear on the Capture tab almost immediately.
Leave the card in the camera
It serves as a backup in case things go wrong. Only enable Delete From Card After Import if you're confident you want that; see Canon Camera Notes.
Normal Operation
Typical Flow
Most events follow a loop like this:
Open an assignment. Either shoot the door marker and let the app read it (see Marker Photos — this is the fast way), tap its row on the Path tab, or tap Complete on the Capture tab to auto load the next one.
Read the note, if there is one. If the assignment carries a note, an Assignment Note dialog appears when you arrive. Tap Got It to clear it and start shooting.
Shoot. Every capture that arrives while this assignment is active is imported, quality-checked, and tagged with it. Watch the banner over the preview for shots still coming across.
Cull as you go. Shot the group three times to catch one baby looking? Tap the chip under the throwaway frames in the Recent strip, so it reads Won't Print, while they're still on screen. See Marking Photos Don't Print.
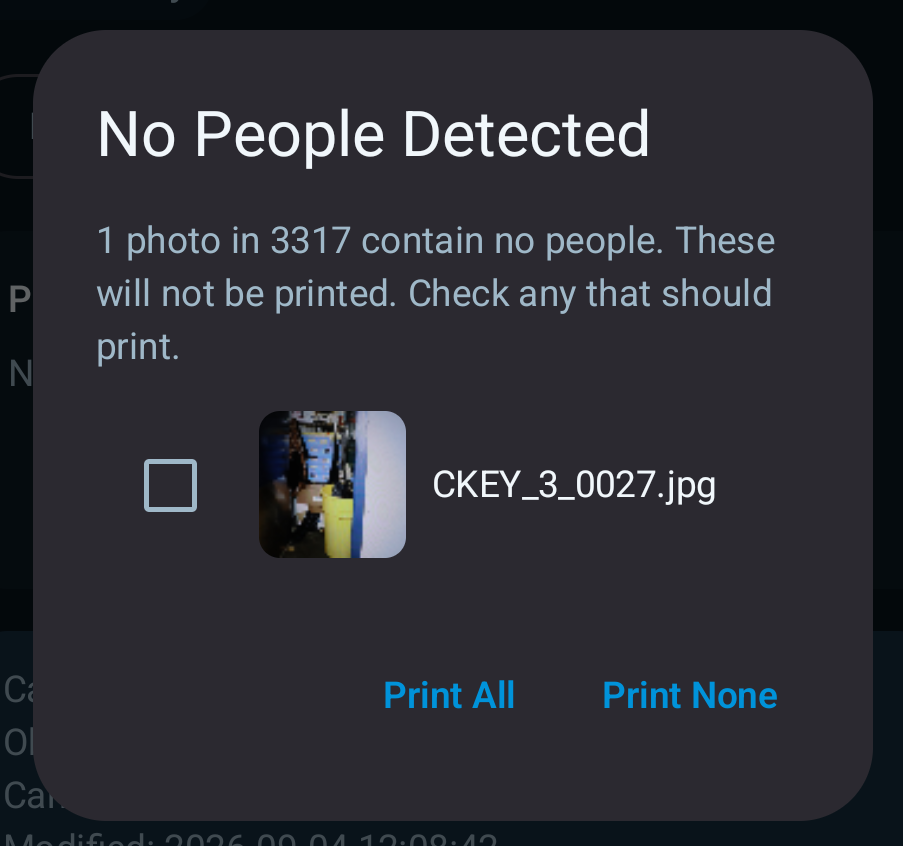
Tap Complete. (or photograph the next number) This may take a few seconds as the app waits for everything to finish processing. If any photos have no people in them, a No People Detected checklist appears. See Completing an Assignment.
The app moves you on. The assignment's photos are batched and uploaded for processing, and the next open assignment on your list activates automatically.
Two variations on the loop:
If a location has nothing to shoot, use Mark No Photos from the row's ⋮ menu on Path. That completes the assignment and flags it; if a photo is later retagged or uploaded onto it, the flag clears automatically.
If someone requests a return, you'll get a notification and the assignment moves to the Return Requested section in Path. Re-open it, shoot, and complete it again.
Why there's no Claim button
Assignments don't need to be "claimed." Activating one just tells your device to tag new photos with that number — two photographers can even have the same assignment active. Completing is the action that's event-global; use Assign to Me only when you want the row to move onto your list.
Completing is what sends the work to print
Photos sitting in an assignment you never completed do not print. Completing is not bookkeeping — it is the step that hands the suite to the print station. Finish every assignment you shoot, and before you leave, check the Path tab for a red will not print banner.
You can practice this loop hands-on in the Interactive Demo before ever plugging in a camera.
Marker Photos
The quickest way to move between suites is to photograph the number on the door. CaptureKey reads the number out of the photo and offers to switch you to that assignment.
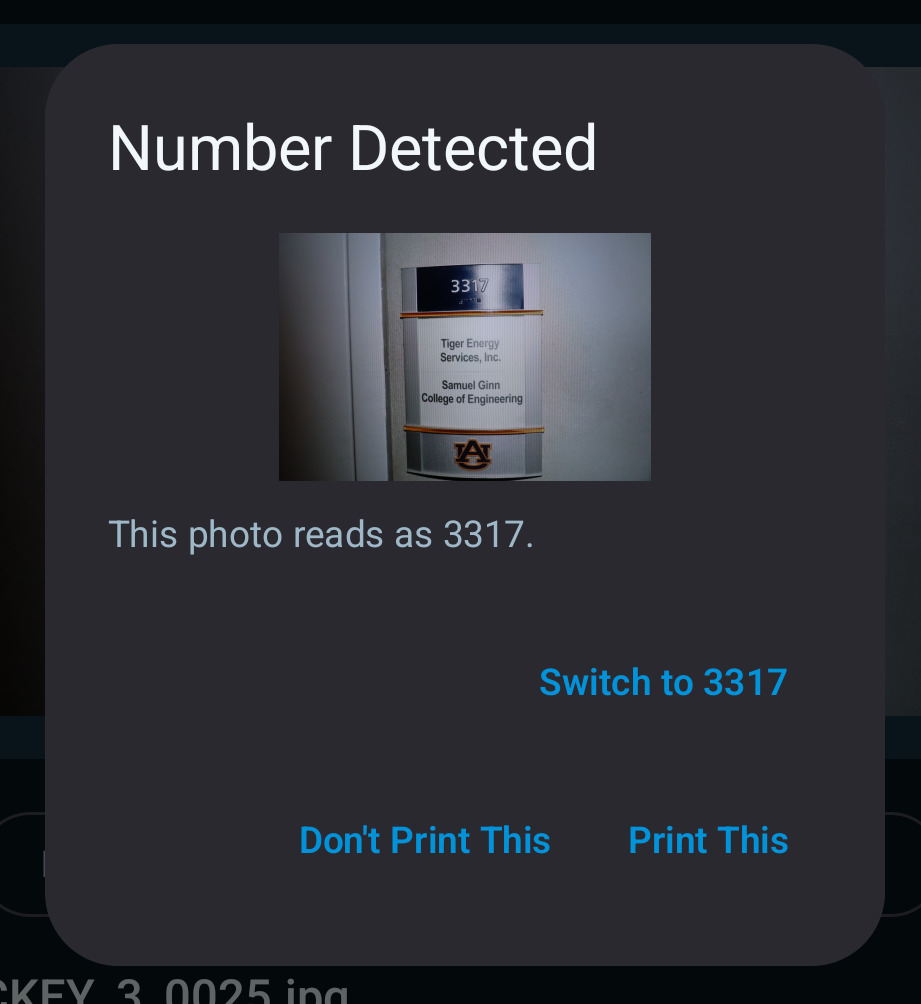
Shoot the plaque, sign, or table card. When the app recognizes a number belonging to this event, a dialog appears:
Number Detected - One match. It reads "This photo reads as [assignment]." Tap Switch to [assignment] to complete your current assignment and open that one in a single step.
Multiple Numbers Found - Several numbers were in frame. Pick the right one with the radio buttons, then tap Switch. The Switch button stays greyed until you choose.
Every version of the dialog also offers:
Don't Print This - Keeps you where you are and flags the marker photo so it never reaches the printer. This is the normal choice for a plaque shot you took as a note to yourself.
Print This - Treat it as an ordinary photo. Use it when the app misread a real photo as a marker. E.g. a number on a jersey, a sign behind the group, etc.
A marker photo you switch on is flagged Don't Print automatically.
If the app can't read the marker
Try taking the photo again, ensuring good lighting and a clear view of the number. Make sure you either delete the incorrect photo(s) or mark them Won't Print.
When the app won't offer to switch
If you've already shot photos into the current assignment after the marker photo, switching would file those photos under the wrong suite. The dialog then shows what it read but offers no Switch button, with the reason on screen. Complete the current assignment normally, then open the next one from Path.
If the assignment the marker names is already completed, or belongs to another photographer, the dialog says so under the number in amber. You can still switch — it's often exactly what you want for a reshoot — but read the note first.
Marker detection is set per event by Operations. If the event has it on, you can narrow it on your own device under Settings → Photo Quality → Marker Photo Detection, and adjust Marker Text Size when background signage is being misread or a real plaque is being missed. You cannot turn detection on for an event that has it off.
Capture Tab
Capture is your home base during the event. It shows the newest (or selected) photo from the camera, its quality results, its assignment tag, and its upload state.
12345
6789101112
Elements:
Active Assignment card - The assignment new photos will be tagged to. Complete closes it out; the ⋮ menu beside it carries the same row actions as Path (Assign to Me, Add / Edit Note, Mark No Photos, Request Return, Reopen). When nothing is active, a Select button takes you to Path instead.
Import banner - Sits over the preview while a shot is coming in, so the gap between shutter and photo has a name: Transferring (bytes moving over USB), Checking quality, Reading card (enumerating a full card after connecting), or a red Transfer failed. Rapid-fire shooting adds "(+n waiting)". The failure banner stays until you tap Dismiss or the next shot starts.
Photo preview - Tap to open fullscreen (pinch to zoom, pan). Long-press and drag left to delete the photo — the red trash background confirms before it commits. Crop guides and face boxes overlay here when enabled.
Recent strip - A horizontal filmstrip headed Recent - n shots, holding your last several frames in this assignment, newest first. Tap a thumbnail to bring it up in the preview. Under each one, a chip states what that frame will do: Will Print filled in blue, or Won't Print outlined. Tap the chip to flip it and cull the frame without leaving the tab. A dimmed thumbnail is one already marked. The strip is per-assignment: it empties when you switch. Set its length with Review Strip under Settings → Display & Power, or set it to 0 to turn it off.
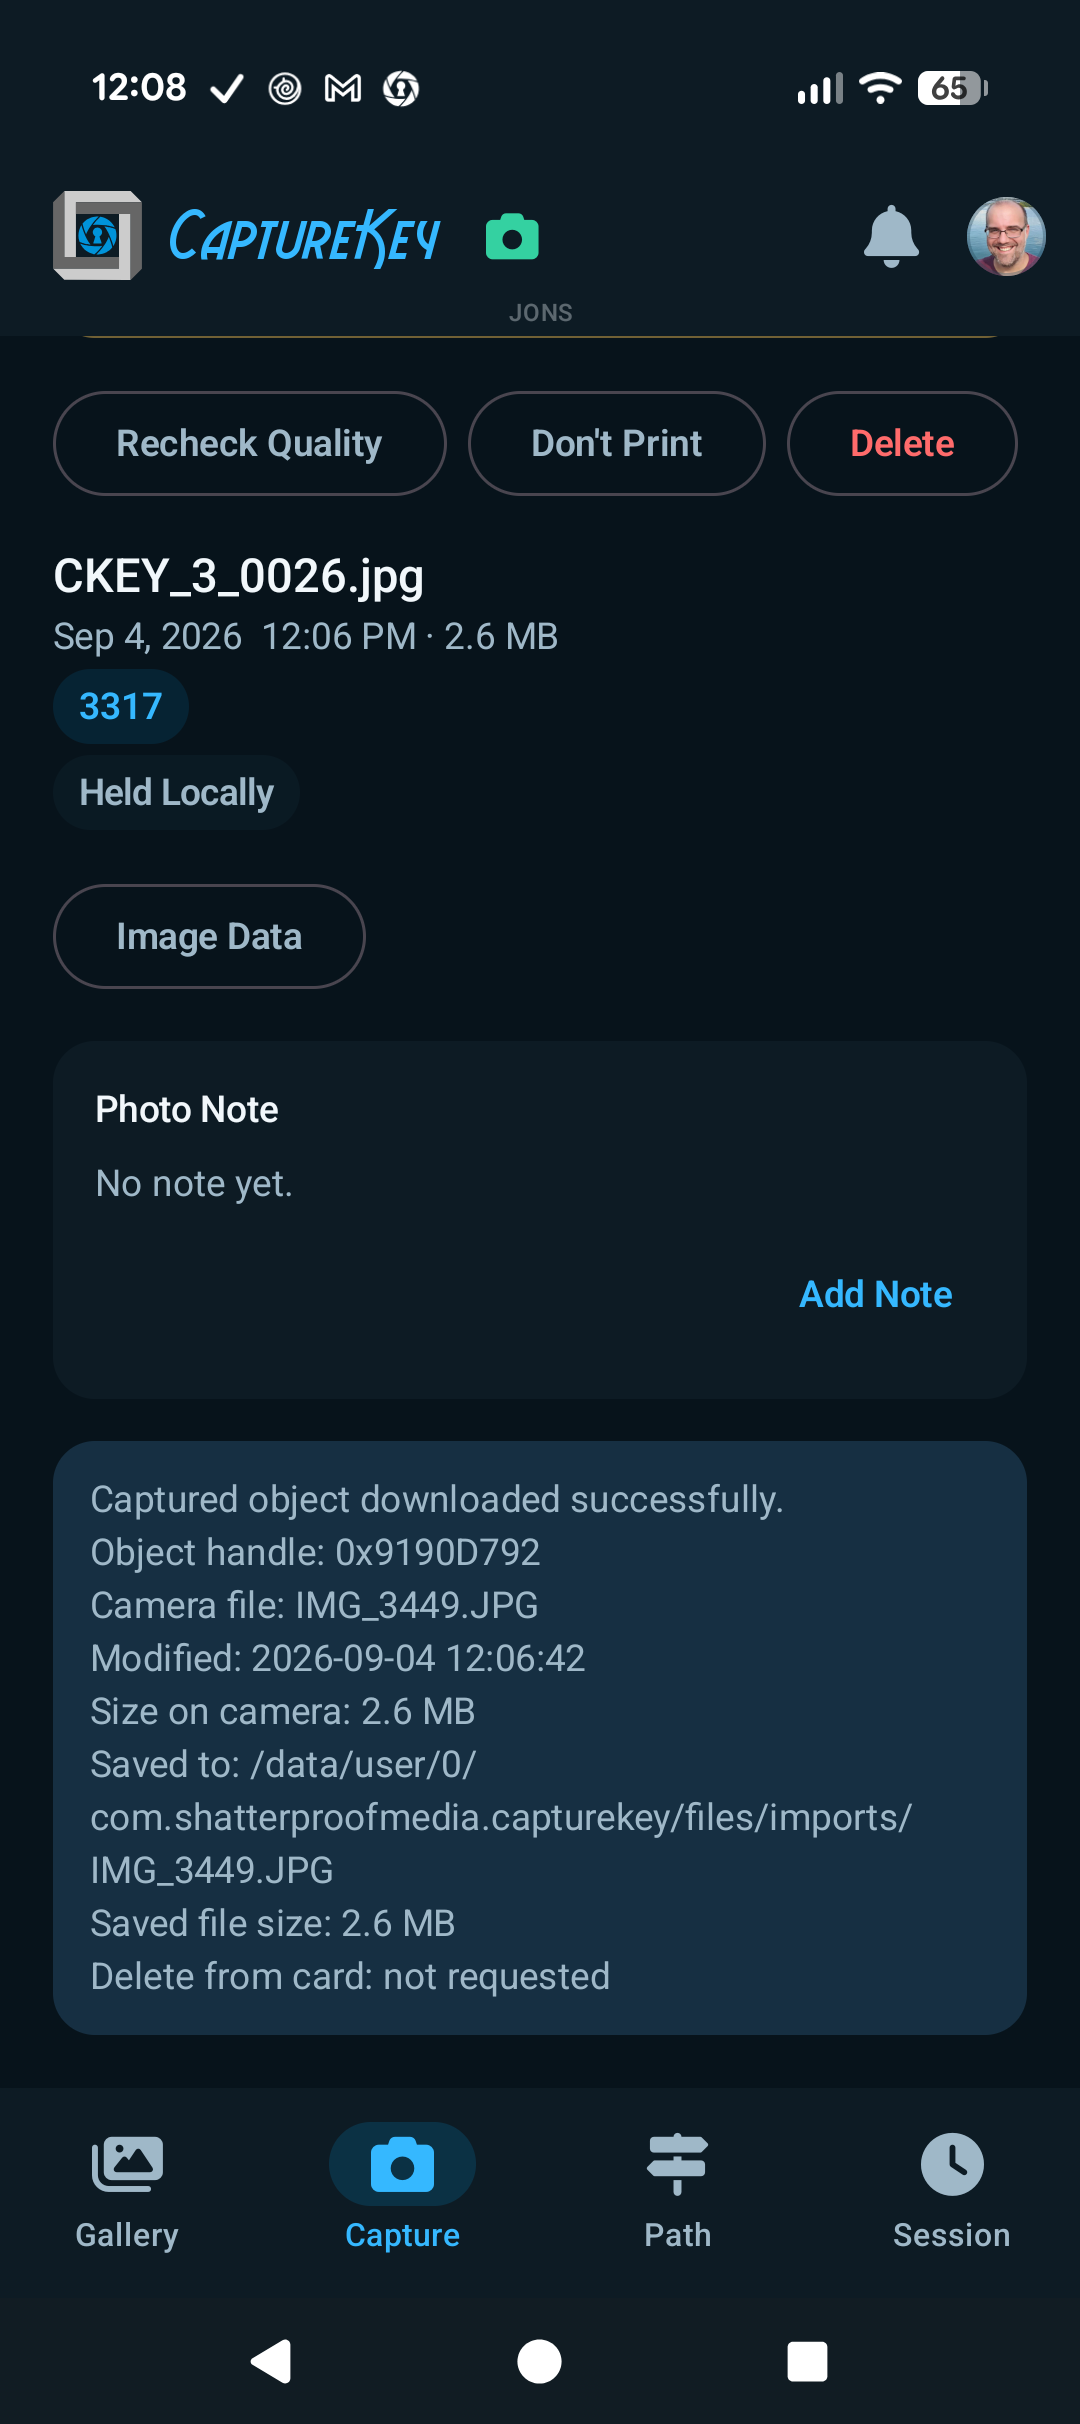
Quality notice - An amber card lists any issues found: possible blink, soft focus, over/underexposed, face near edge of frame. See Photo Quality Checks.
Recheck Quality - Re-runs the quality analysis on the current photo, using the current settings.
Delete - Removes the photo, with a brief Undo on the snackbar. The file isn't actually gone until the snackbar closes.
Assignment badge - The assignment this photo is tagged to. Tap it to retag this single photo; retagging does not change your active assignment.
Upload badge - The photo's live upload state. See Upload States.
Image Data - Opens a dialog with the photo's app metadata (photo ID, managed filename sequence, original camera filename, camera identity, tag source, upload state, quality issues, …) and its EXIF data. Text is selectable for copying into a report.
Photo Note - Free text attached to this single photo. Notes sync to the server with the photo.
New captures automatically become the displayed photo. Recent frames are one tap away in the strip; for anything older, use the Gallery — tapping a thumbnail there opens it here.
Once a photo has uploaded, Capture goes read-only for it
Retag, Skip Print, and Delete grey out on an uploaded photo, and the card reads "Already uploaded — use the gallery to change this photo." The Gallery can still act on it.
Completing an Assignment
Completing is the most important action in the app: it's what sends a suite to the print station. It is also the one action that deliberately takes a moment.
What you'll see
The Complete button turns into a spinner and the assignment card reports what it's waiting on: "Closing out…", then "Checking camera for new photos…", then "Waiting for n photos to finish importing…" if any are still in flight.
If the assignment holds photos with no people in them, the No People Detected checklist appears. See below.
The assignment is marked complete for the whole event, its photos are frozen into a batch, and the next open assignment on your list activates — with a banner naming it, and its note if it has one.
Completing from the Capture tab drops you on Path so you can see where you are in the list. Swipe back to Capture when you're ready to shoot.
Why the wait
The app drains the camera before it closes the books. A shot still crossing the USB cable when you tap Complete would otherwise land after the batch was frozen and get filed under the next suite. The few seconds are the app making sure your last frame is in the right envelope. If a photo genuinely can't be recovered in time, the Session Activity log says so by name rather than staying quiet.
The "No People Detected" checklist
The dialog reads "# photos in [assignment] contain no people. These will not be printed. Check any that should print." Everything starts unchecked, because these are nearly always marker shots, test frames, and room photos.
Scroll the list and tick anything that should print — an empty-room detail shot the client asked for, for example.
Print n of m - Confirms your ticks. With nothing ticked the button reads Print None.
Print All - Prints every photo in the list; nothing gets flagged.
There's no way out but through
This dialog can't be dismissed by tapping outside or pressing back, and both buttons complete the assignment — they differ only in what gets flagged. You already asked to close the assignment; this only decides what prints. If you tapped Complete by mistake, answer the dialog and then reopen the assignment from Path.
Gallery Tab
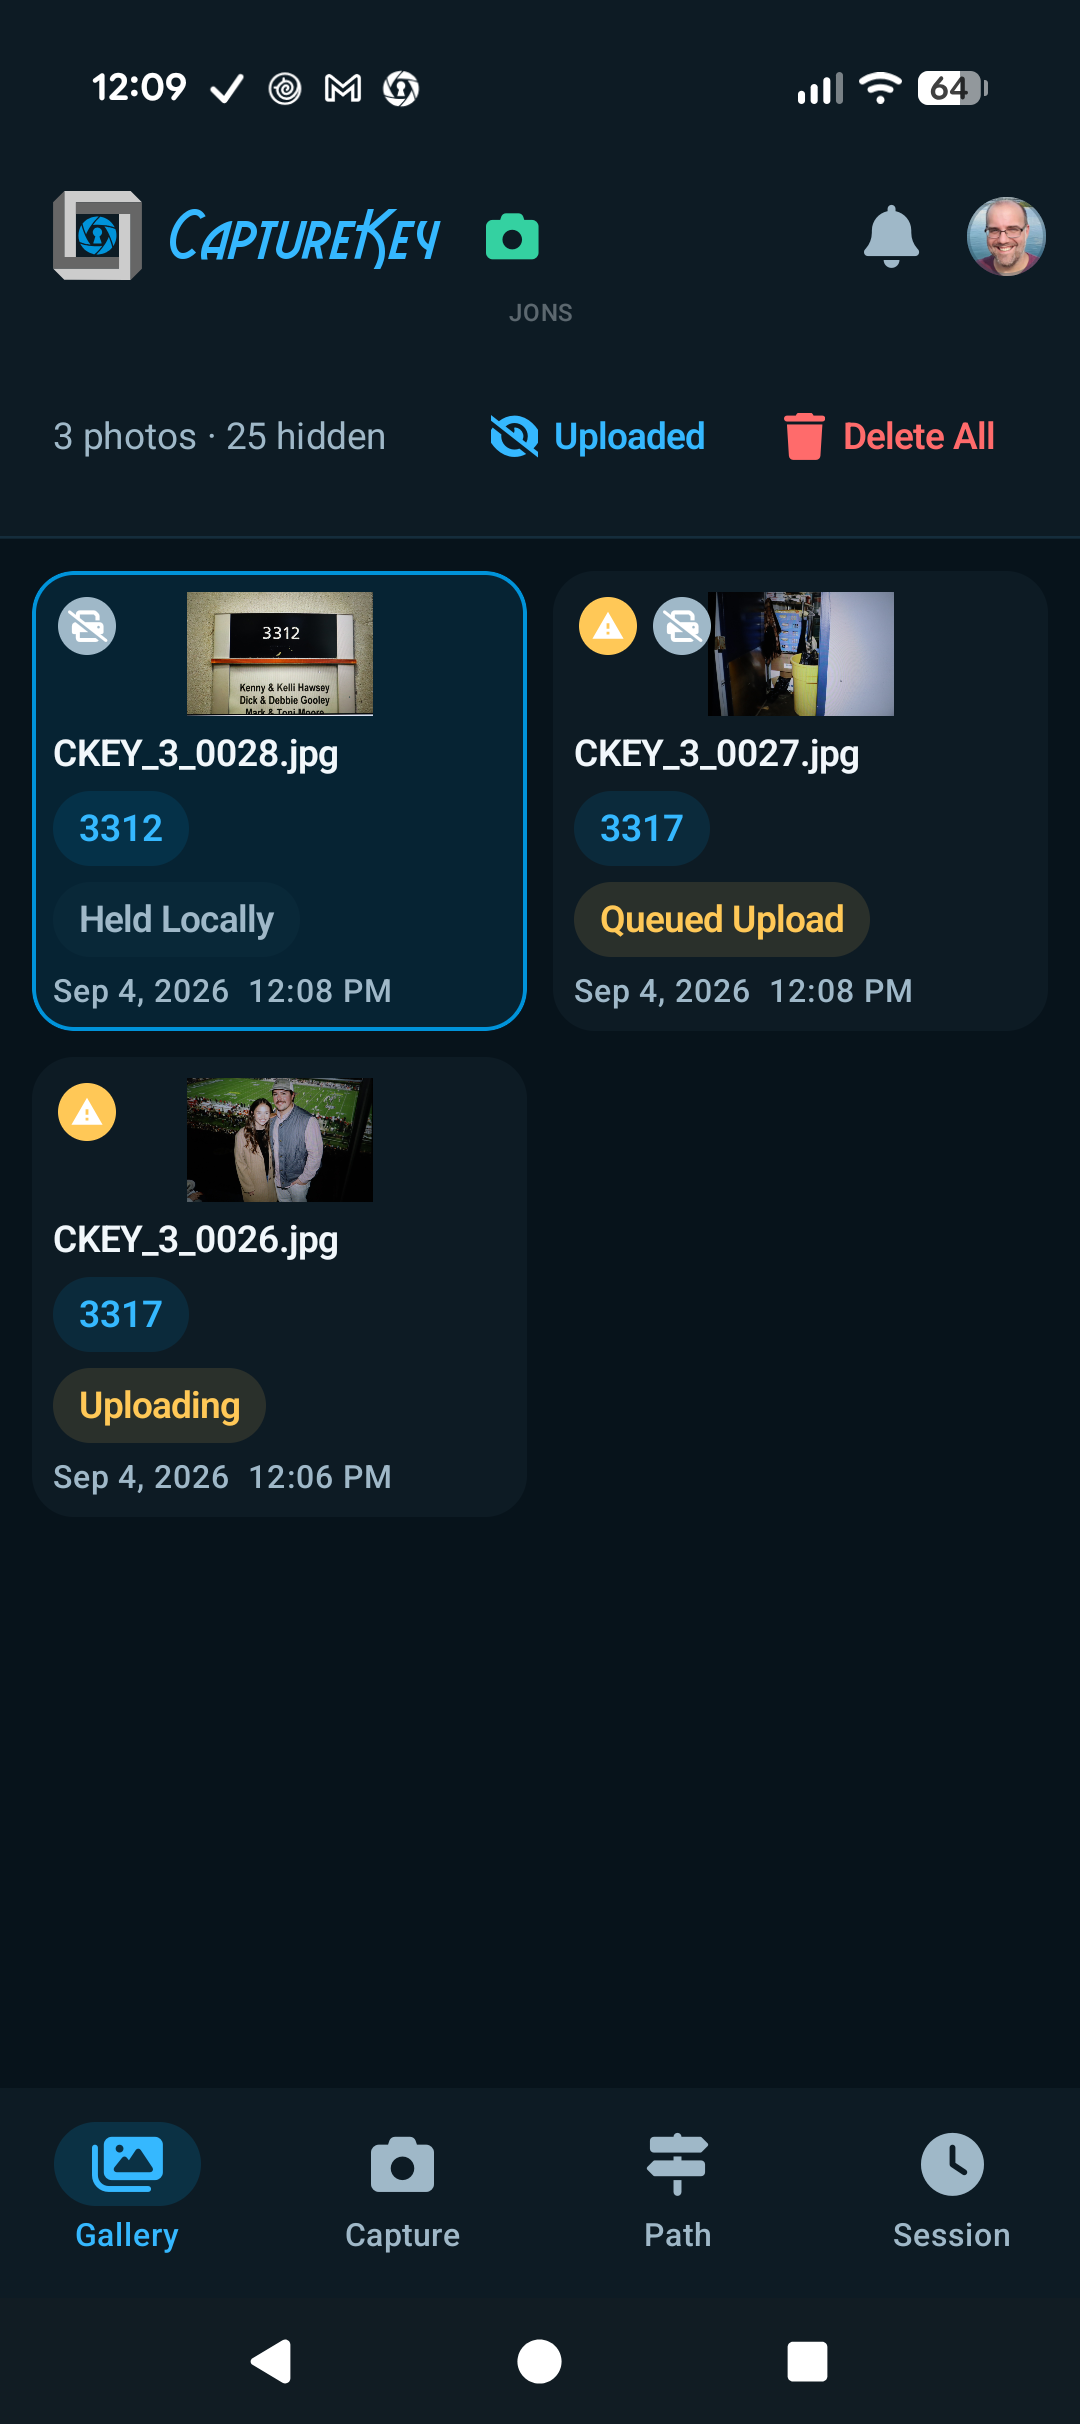
Gallery shows the photos imported to this device. Use it to review, retag, or delete in bulk.
126
Elements:
Thumbnail grid - Each card shows the filename, assignment badge, upload badge, timestamp, and any note. A warning icon in the corner marks photos with quality issues, and photos marked Don't Print are dimmed. Tap a photo to open it on Capture; long-press to start multi-select.
Uploaded toggle - By default the grid hides photos that have finished uploading (the header shows how many are hidden). Tap Uploaded to show or hide them.
Selection mode - After a long-press, tap to add or remove photos. The header shows the count and exposes Retag, Skip Print, and Delete.
Retag - Reassigns every selected photo to the same target in one step (or clears their tags). Useful if you shot someone into the wrong suite.
Skip Print / Print - Flags or unflags every selected photo at once. This is the place to cull a run of frames you didn't catch during the shoot. See Marking Photos Don't Print.
Delete / Delete All - Always confirms first. Deleting a photo that was already uploaded only removes the local copy on the phone.
Be deliberate with Delete
Deletion on the phone is not reversible from within the app, and a photo you delete here will not be re-imported from the card — the app remembers that you meant to get rid of it. If a photo hasn't uploaded yet, deleting it means the photo is gone. To take a shot out of the printed set while keeping it, use Don't Print instead of Delete.
Path Tab
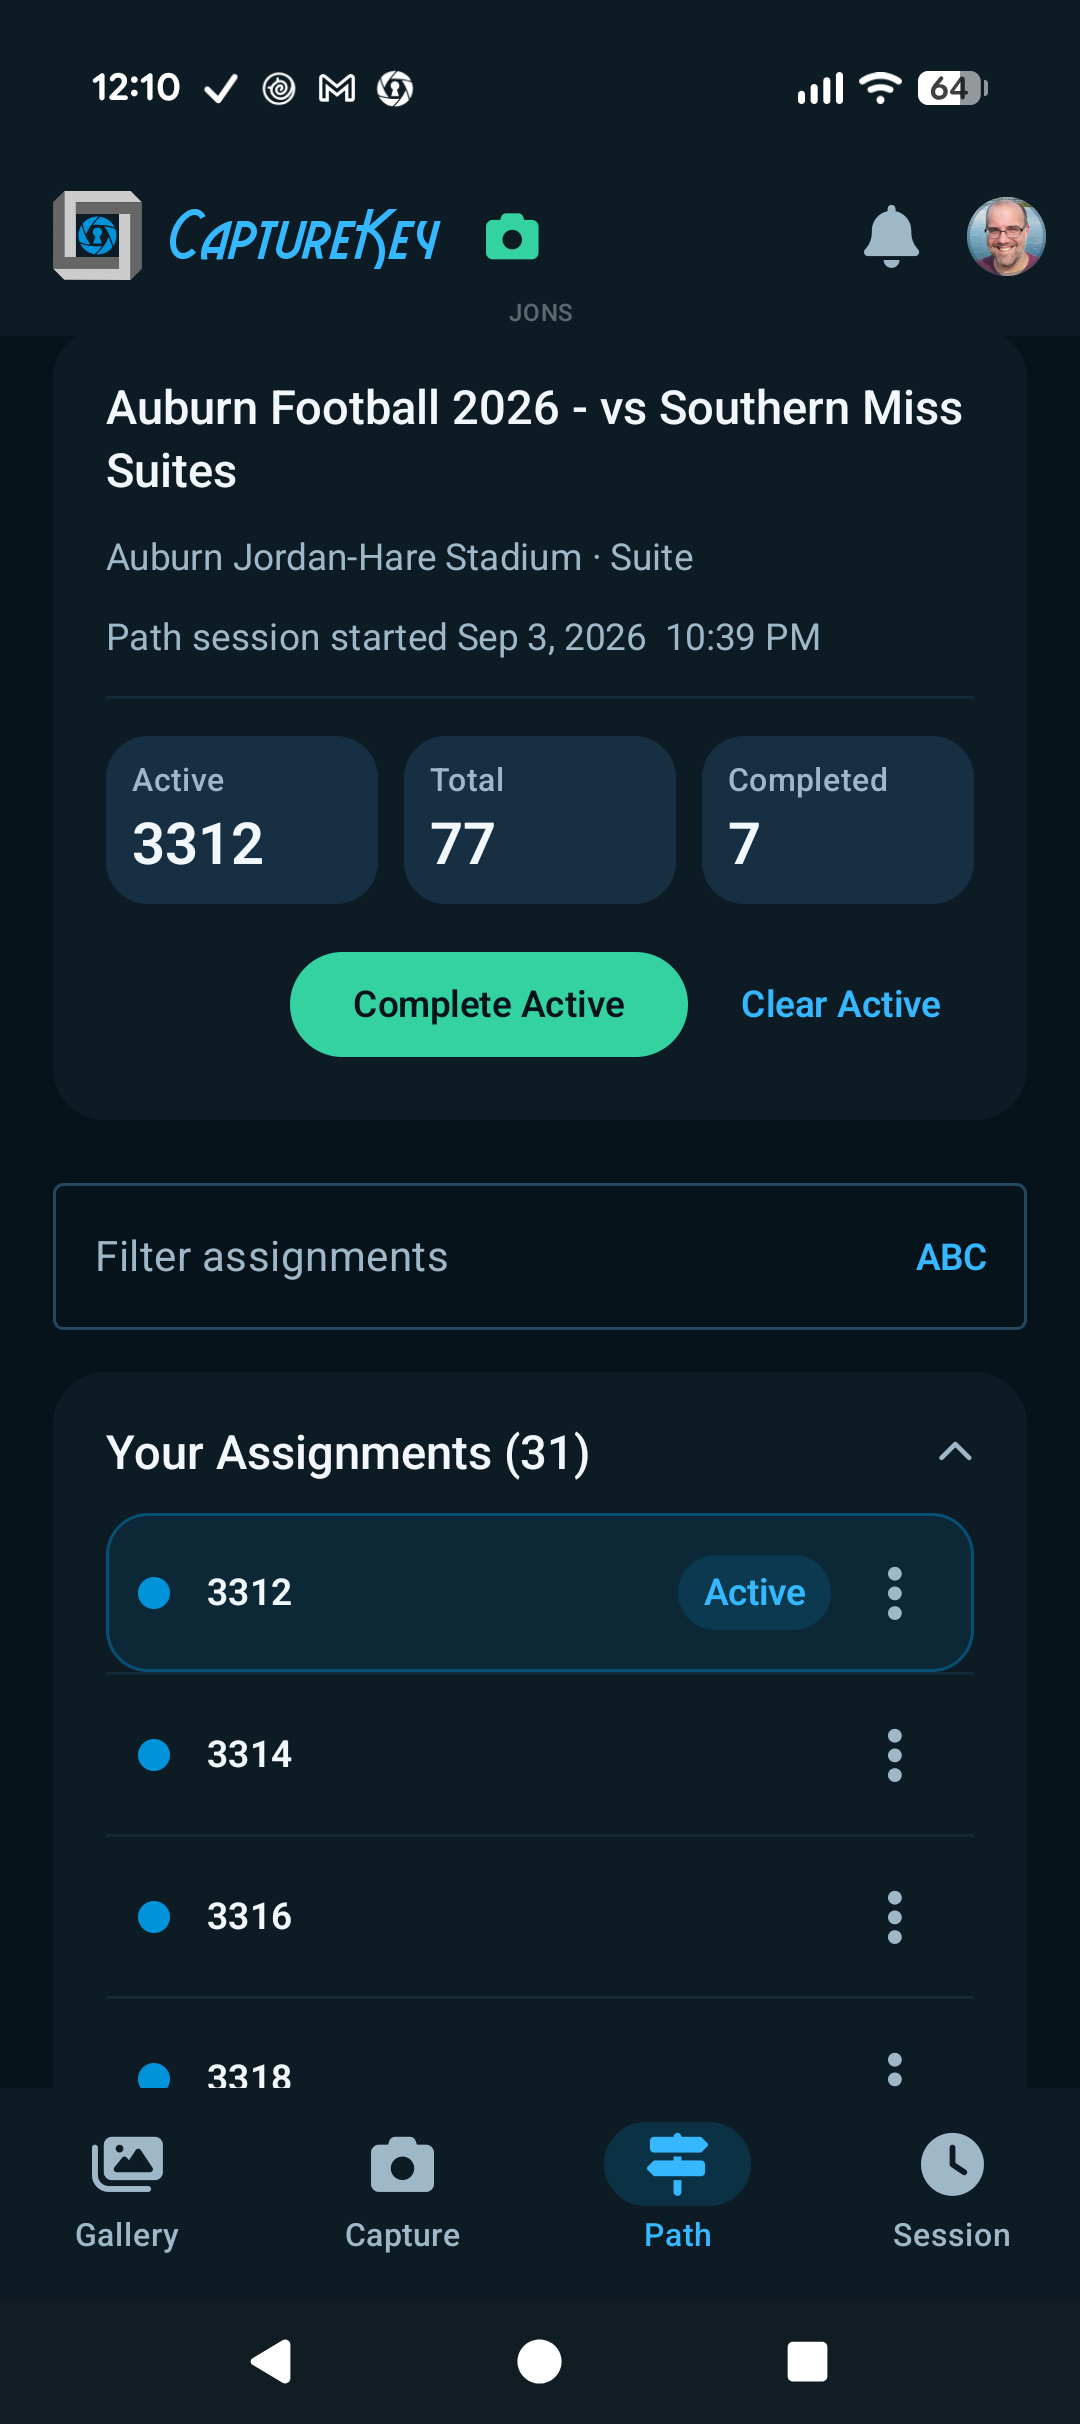
Path is the event-wide view of every assignment — the same list everyone else on the team sees. Pull down to refresh it from the server.
123
Session overview card - Event name, venue, when your path session started, plus Active / Total / Completed counters. When an assignment is active you also get Complete Active and Clear Active buttons here.
Filter box - The fastest way to find an assignment. It opens with a number keyboard (assignments are usually numbers); tap ABC to switch to text and search by name. Matches filter every section live.
Active assignment row - Marked with and Active chip.
"Will not print" banner - A red banner above the list when an assignment you completed did not reach the print station. This is the one thing on this tab you must not scroll past. See "Will Not Print" Warning.
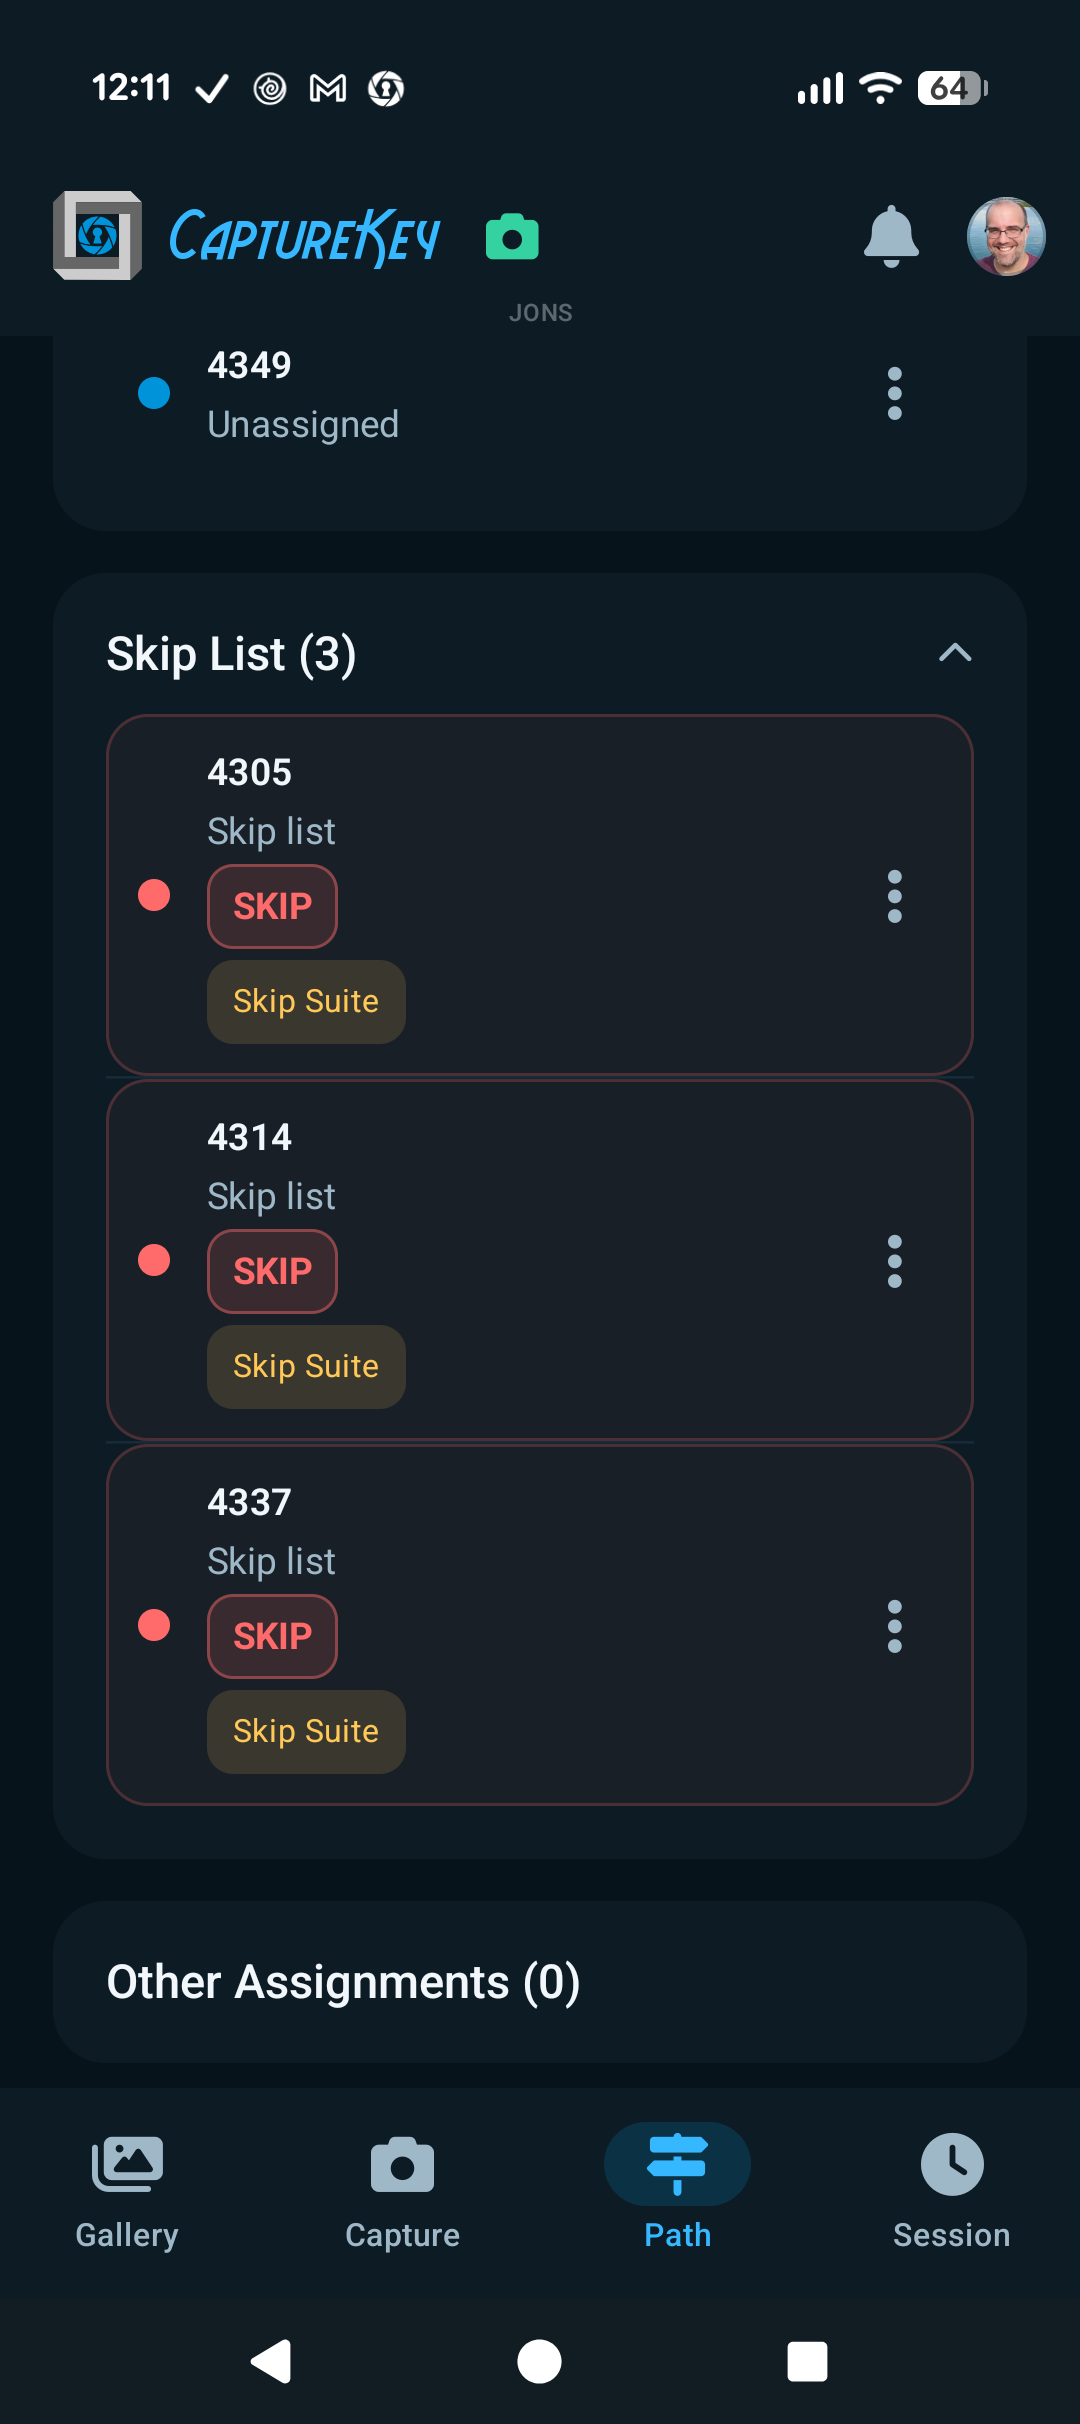
Assignments are grouped into sections:
Your Assignments - Open items assigned to you.
Return Requested - Items someone asked for another pass on. Treat as higher priority.
Unassigned - Fair game for anyone to pick up.
Skip List - Red rows with a SKIP flag. Do not disturb unless Operations tells you otherwise.
Other Assignments - Assigned to someone else. Visible for context.
Completed - Finished rows, with who completed them and when.
Tapping a row activates it on this device. The active row is highlighted with an Active chip. Activating a Skip-listed row is allowed but shows the red warning styling.
Assignment notes: read here, delivered there
An assignment's note is printed on its card here, so you can tap through rows and read notes freely without dialogs firing. The full-screen Assignment Note prompt only appears when an assignment arrives at you — via a marker photo switch or the auto-advance after a completion — where you'd otherwise start shooting without ever seeing it. It reappears every time you arrive that way; it's a message on arrival, not a setting you dismiss once.
Row actions (⋮ menu):
Not every action shows on every row — the menu adapts to the assignment's state.
Assign to Me - Pulls the assignment onto your list, replacing the previous owner.
Complete Assignment - Completes without needing to activate first.
Add / Edit Note - Free-text note on the assignment itself, visible to the whole team.
Show Retrieval QR - If the event has a media-code URL configured, shows a QR guests can scan to retrieve this location's photos.
Mark No Photos - Completes the assignment and flags it as having no photos.
Request Return - Flags the assignment for another pass and notifies the photographers involved plus Operations.
Reopen Assignment - Moves a completed or return-requested row back to open — and assigns it to you.
Session Tab
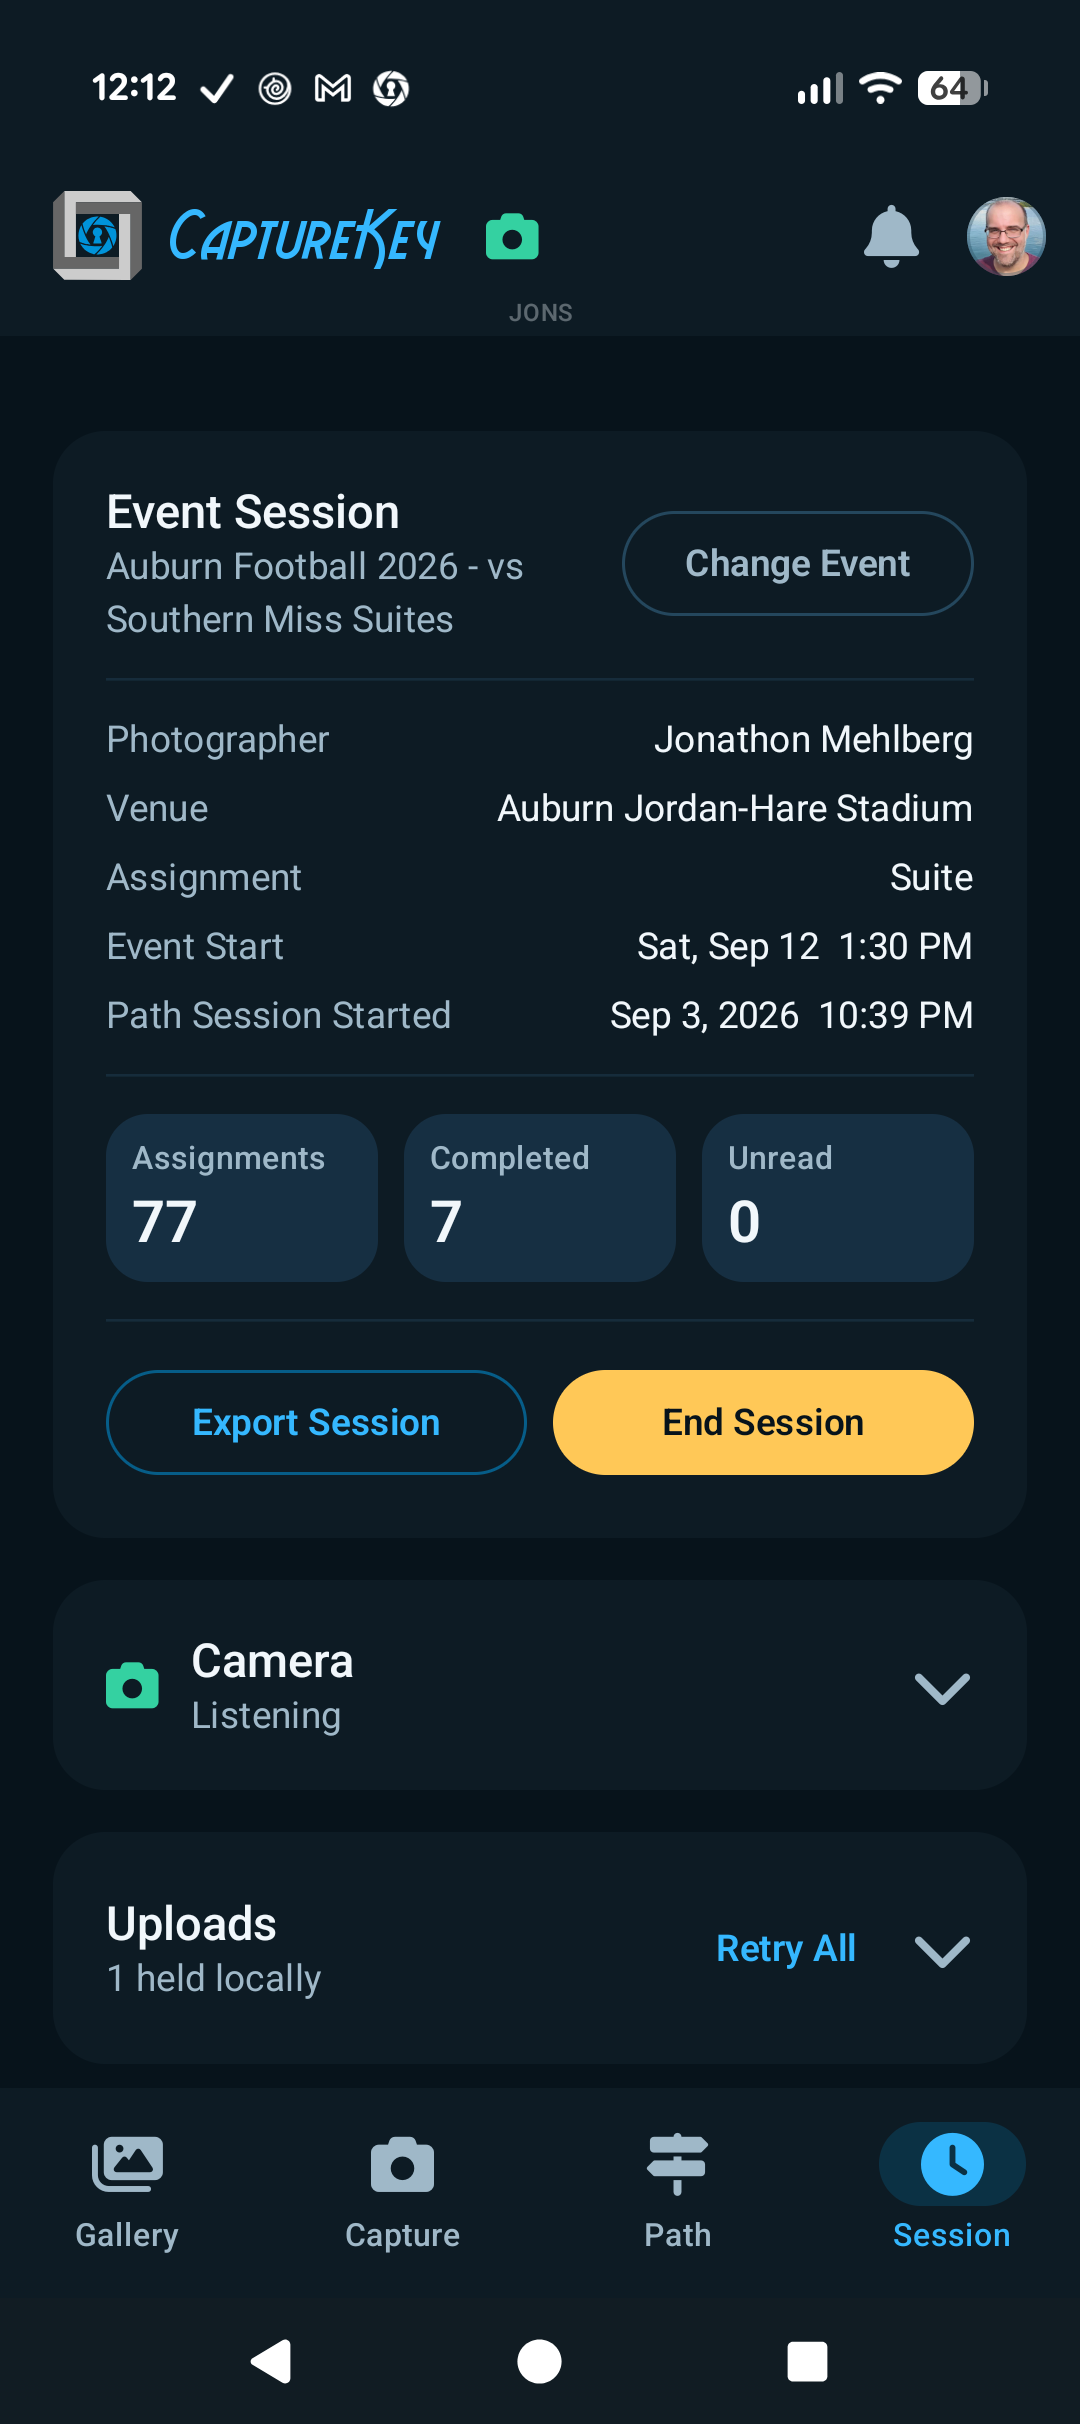
Session holds everything that isn't part of the per-photo, per-assignment loop: the event this device is attached to, the camera connection, upload status, and the activity log. Pull down to refresh.
123
Event Session card - The active event with photographer, venue, event start, and session start, plus Assignments / Completed / Unread counters. Change Event opens the event picker; Export Session starts a transfer; End Session opens the wrap-up dialog.
Camera card - Connection state with Connect / Disconnect buttons, a status line, the imported-photo count, and the connected camera's identity (name, stable ID, serial, USB IDs) — useful when reporting a misbehaving body. Also holds the Delete From Card After Import switch (off by default; removes the camera copy only after a successful import).
Uploads card - Appears whenever photos haven't finished uploading. Summarizes counts by state and expands to per-photo rows with progress bars, error text, attempt counts, and per-photo Retry / Cancel buttons, plus Retry All. See Upload States.
Session Activity - A running log of what the app has done (imports, uploads, assignment changes, sync results). The newest entry always shows; expand for history. Worth a look after a messy close-out: if photos were still importing when an assignment was completed, this log names them.
Event Notes
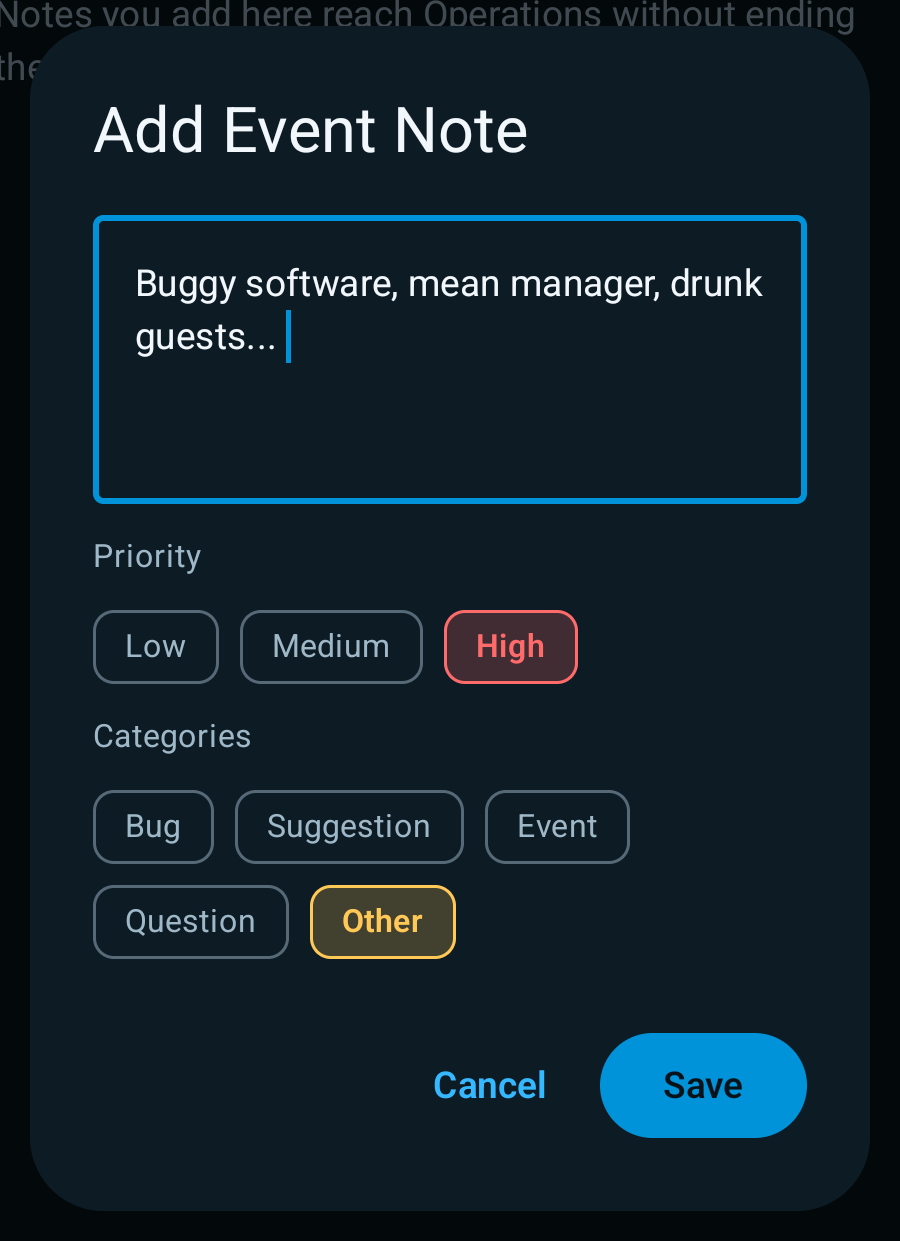
Open Event Notes from the user menu to jot down anything about the event that Operations should see — without waiting for the end of the session. As the app puts it: "Notes you add here reach Operations without ending the session."
Each note takes a priority (Low, Med, High) and one or more categories:
Bug - The app misbehaved. Say what you were doing when it happened.
Suggestion - Something that would have made the shift easier.
Event - Something about the venue or the day itself: a suite that was locked, a room that renumbered, a schedule that slipped.
Question - Something you need an answer to.
Other - Anything else.
Notes sync to the server with the rest of your session data, so they survive going offline. Use these for observations about the event; use Send Message when you need someone to act now.
Settings
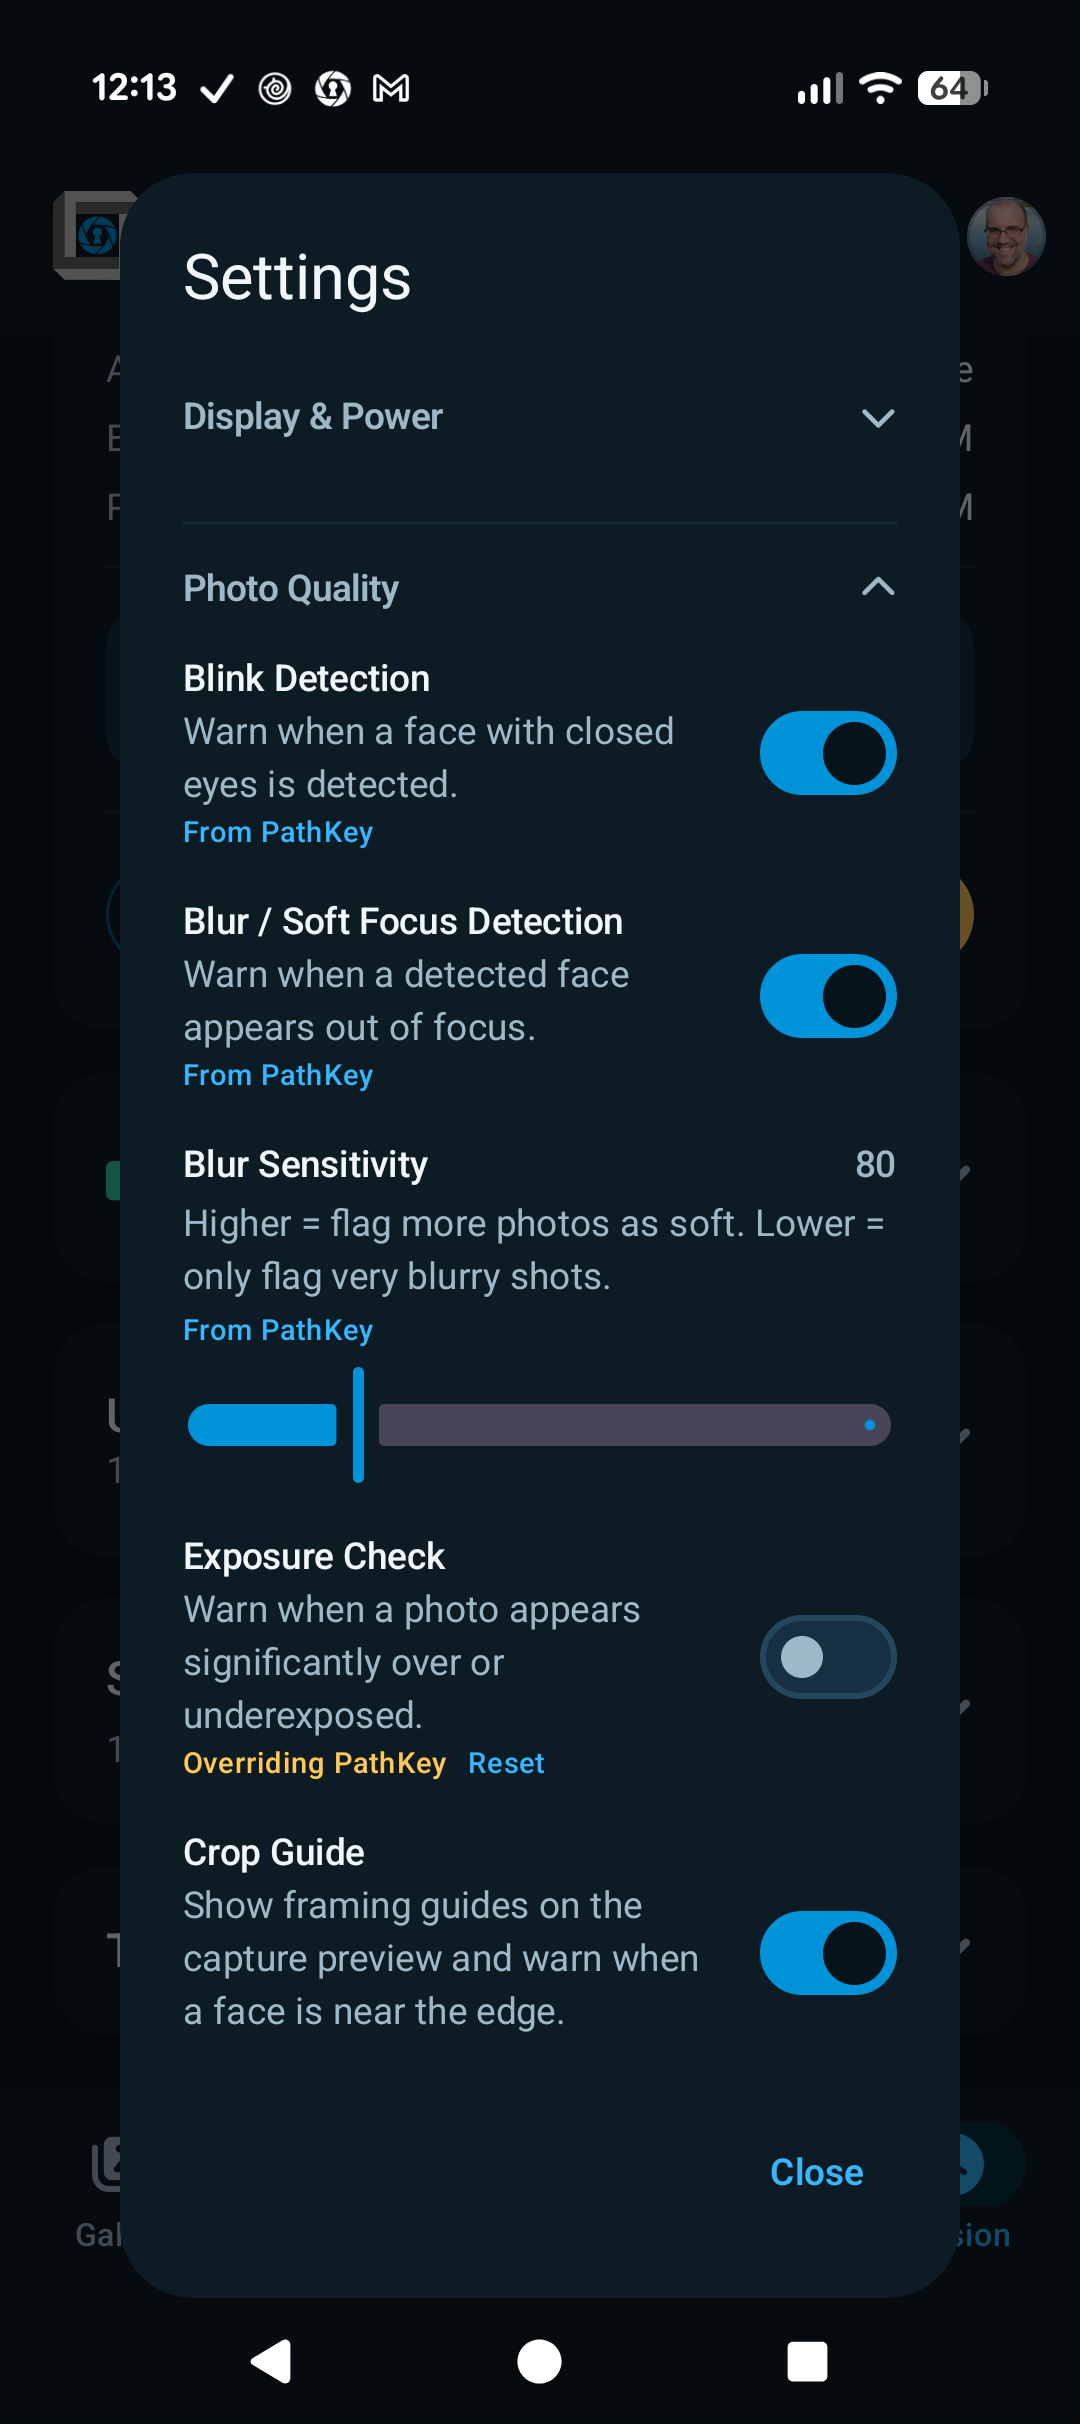
Open Settings from the user menu (your profile picture, top-right). Settings are grouped into collapsible sections:
12
From PathKey - The event supplies this value.
Overriding PathKey - This device changed the event value; tap Reset to restore it.
General
Dark Mode - Dark theme throughout the app. Sometimes turning this off helps in bright or sunny conditions.
Lock Rotation - Keep the app in portrait on this device.
Keep Screen Awake - Keeps the screen on while a camera is connected.
Dim When Idle - With Keep Screen Awake on, dims the screen after a configurable idle timeout to a configurable brightness. Touch the screen to wake it back up.
Review Strip - How many recent shots stay on the Capture tab for review. The strip clears when you open another assignment. Set it to 0 to turn the strip off.
Notification Check Interval - How often the app polls the server for new notifications. Faster uses more battery and data.
Update Check Interval - How often the app checks for new releases in the background. A check also runs at every login.
Photo Quality
The quality-check controls — see Photo Quality Checks for what each does — plus the marker-photo controls:
Marker Photo Detection - Read numbers from marker photos and offer to open that assignment. Only appears when Operations has enabled detection for the event; you can turn it off for your device, but you can't turn it on when the event has it off. See Marker Photos.
Marker Text Size - Ignore text smaller than this share of the photo height. Raise it when background signage is being read by mistake; lower it when a real marker is being missed.
"From PathKey" and "Overriding PathKey"
When the event's PathKey configuration sets a quality field, the field shows a From PathKey caption. You can still change it — the field then shows Overriding PathKey with a Reset link, and your override lasts only for the current session on this device. It is never saved as the device default. Fields PathKey doesn't set behave normally and persist on the device. (Marker Photo Detection is the exception: turning it off is a device setting that sticks.)
Admin
Visible only to admin/super accounts: edit the device SMID, add the SMID widget to the home screen, and open the Diagnostics page.
Help
The user menu also has a Help item, which opens this manual in a browser.
Notifications & Messages
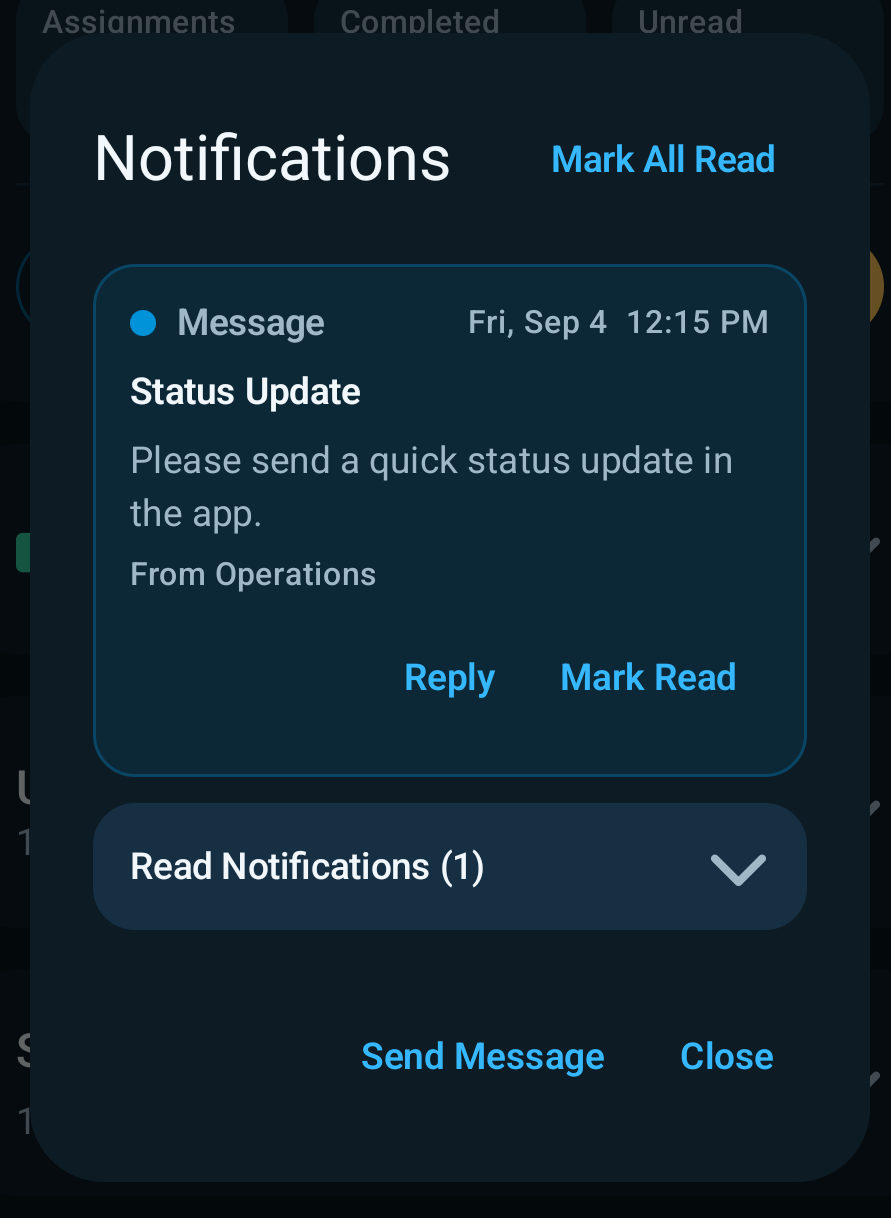
Everything event-wide — messages, return requests, upload failures, system notices — shows up behind the bell in the top bar. Unread items bump the badge and animate the bell, and (depending on your settings) play a sound or vibrate. The app checks the server on the configured interval.
Unread notifications are listed first; read ones collapse into a Read Notifications group.
Tap a notification (or Mark Read) to mark it read; Mark All Read clears the badge. Read state is per-photographer and syncs to the server.
Reply on a message opens a pre-addressed response to the sender (Operations or the photographer who wrote it).
Send Message - Compose to Everyone, Operations, or a specific photographer on the event. Two quick presets fill common bodies: Please visit this suite and Need reprints.
End Session
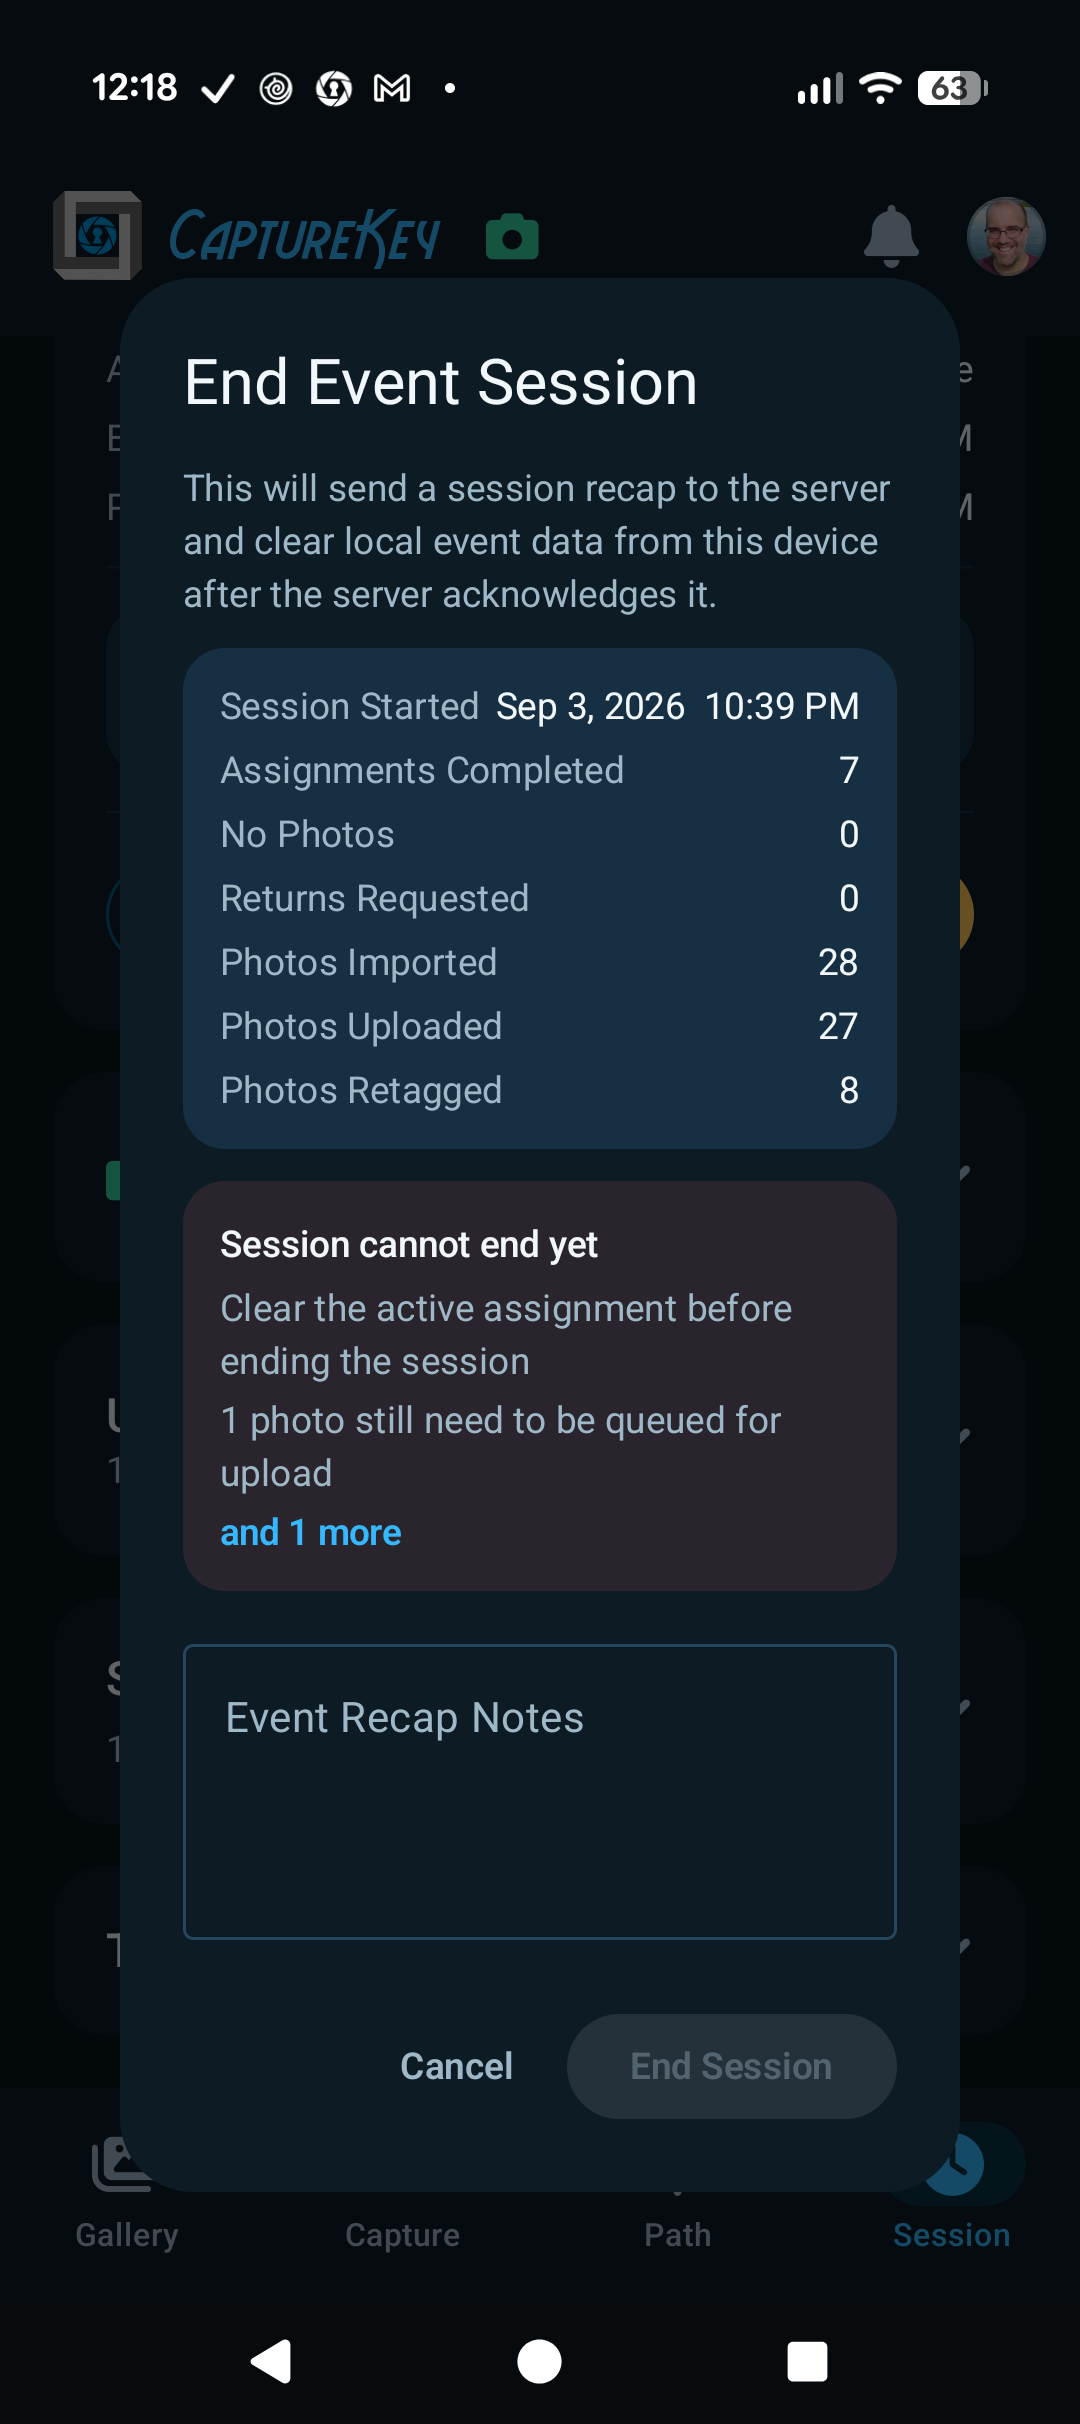
End Session is the event wrap-up for this device. Reach it from the user menu or from the Event Session card on the Session tab. It sends a recap summary to the server, then clears all event-scoped data — including every imported photo file — from the device.
123
Session summary - General information about the event.
Readiness blockers - Items that must be resolved before the session can be ended.
Event recap notes - Any notes to send to operations.
Readiness blockers
The dialog lists what's outstanding and will not let you confirm while any of it is true. Long lists collapse; tap to see the rest.
"Clear the active assignment before ending the session" - Complete it or use Clear Active on Path first.
"# photos still need to be queued for upload" - Photos Held Locally, usually because their assignment was never completed.
"# photos are still waiting to upload" / "still uploading" - Give it time on a good connection.
"# photos still have failed uploads" - Retry from the Session tab.
"# workflow updates are still waiting to sync" - Pending local actions (completes, retags, notes) must reach the server first.
"# photos are not in a batch yet and would not reach the print station" - Photos belonging to no completed assignment. Find them in the Gallery, tag them to the right assignment, and complete it. See Assignment Batches.
These blockers are the last automatic check that your work will actually print. Work through them rather than around them.
Recap notes
Use the notes field for anything Operations should know: which suites had issues, what equipment misbehaved, guest feedback worth logging. The text is stored with the session summary on the server, along with any Event Notes you logged during the shift.
What happens on confirm
The app sends the session summary (assignments completed, photos imported/uploaded, camera identity, device SMID, recap notes) to the server. The call is idempotent — a retry won't create duplicates.
On success, every imported photo file is deleted from the device and all event-scoped state is cleared.
You stay signed in, back on the Session tab with no event loaded — ready to pick the next event or hand the phone off.
Point of no return
End Session is destructive on the device. Don't end until all uploads are complete — the blockers enforce this, so don't work around them by deleting un-uploaded photos unless you truly mean to discard them.
Logging out is separate
Logout in the user menu only clears who is signed in. If the event session hasn't been ended, the app warns you before letting you log out anyway.
What Prints
Uploading and printing are two different things, and it's worth being clear on the difference.
Uploading puts a photo on the server. Every photo you keep uploads, including ones marked Don't Print — they're a visual backup of the shoot.
Printing is decided by two things: whether the photo is flagged Don't/Won't Print, and whether its assignment's batch reached the print station intact.
A photo prints when it is not flagged and its batch arrived. That's the whole rule.
Marking Photos Don't/Won't Print
Some frames should never reach a printed product: the door marker you shot to change suites, the test frame you fired to check exposure, the two attempts at a group photo where the baby was looking away. Flagging them keeps the printed set clean without throwing the images away.
There are four places this happens:
Where
How
Best for
Review strip Capture tab
Tap the chip under the thumbnail so it reads Won't Print. The thumbnail dims.
Culling as you shoot — the fastest option, and the one to build a habit around. Marked frames stay in the strip, so tapping the chip again undoes it.
Current photo Capture tab
The Skip Print button under the preview.
The shot you're looking at right now.
Gallery selection
Long-press to select, tap more photos, then Skip Print.
The app also flags photos itself in two cases: a marker photo you switched on, and photos the close-out sweep found no people in. Either way the flag is reversible until the photo uploads.
Don't Print is not Delete
A flagged photo still uploads and still lives on the server — it just won't be printed. Prefer it to Delete whenever there's any chance someone will want the frame later. Deleting is permanent and the photo won't be re-imported from the card.
Once a photo has finished uploading, its flag is settled and the Capture tab's button greys out. The Gallery can still act on it.
Assignment Batches
When you complete an assignment, the app freezes its photos into a batch: a fixed list of exactly which photos belong to that suite, in order. The batch is what the print station works from, and it's why completing matters so much.
A batch is all-or-nothing by design. The print station waits for a complete assignment before printing. So a batch either lands complete and prints, or it doesn't land and somebody has to be told — which is what the warning banner is for.
Two consequences worth knowing:
Completing may take a few seconds. The app drains everything still coming off the camera before it freezes the list, so a shot in flight doesn't get stranded in the wrong suite.
A batch's contents don't change afterwards. Retagging a photo onto an already-completed assignment doesn't rewrite that batch. If you find a photo in the wrong suite after completing, tell Operations rather than assuming a retag fixed the print run.
Batches are normally invisible. The only time you deal with one directly is when it fails.
"Will Not Print" Warning
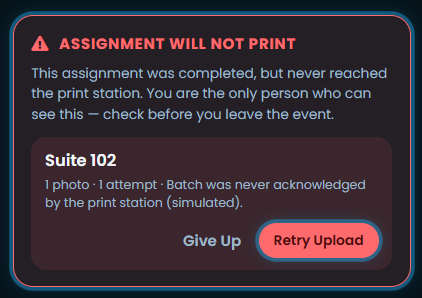
A red ASSIGNMENT WILL NOT PRINT banner on the Path tab means an assignment you completed never reached the print station.
You are the only person who can see this
A failed batch is invisible downstream on purpose — from the print operator's side, a stuck assignment and an assignment nobody shot look identical. Nobody else will catch it. That's why the banner can't be dismissed: it clears when the server confirms the batch, not when you acknowledge it. Check the Path tab before you leave an event.
The banner names each affected assignment with its photo count, attempt count, and any error text. You have two actions:
Retry Upload - Always try this first. It costs nothing and it's the entire fix when an upload simply never started. Retrying reuses the same batch, so it can't produce a duplicate.
Give Up - Only after a retry hasn't cleared it. What this means depends on the situation, and the confirmation dialog will tell you which one you're in.
The two "Give Up" dialogs
Dialog
What happened
What to do
Check With The Print Operator First
The assignment was sent, but the print station has no record of it. The photos may well still be on the server, belonging to no batch.
Ask the print operator before reshooting. They can check and can send the photos to print without a reshoot. Remove From Device clears the banner so you can carry on; the assignment stays closed.
Give Up On This Assignment?
The photos are gone from the device and never reached the server. Nothing exists anywhere.
A reshoot is the only remedy. Give Up And Reshoot deletes the local photos and reopens the assignment. This cannot be undone.
Common causes: the upload never started, the photos were deleted from the device before they finished uploading, or the event was reset server-side after you sent them.
Assignments that are merely slow don't appear here
A batch still uploading or retrying in the background never reaches this banner. If it's on screen, something is genuinely wrong and needs you. That's deliberate — a warning that cried wolf would get ignored on the day it counted.
Photo Quality Checks
Every imported photo is analyzed on the device, immediately after import. Problems appear as an amber notice card on Capture, a warning icon on the Gallery thumbnail and in the review strip, and in the photo's Image Data. Checks are merely informational. A flagged photo still uploads normally, and nothing is ever marked Won't Print on the strength of a quality issue. You make the final decision on what photos to keep/print.
Check
What it flags
Tuning
Blink Detection
A detected face with closed eyes ("Possible Blink").
On/off.
Blur / Soft Focus
A detected face that appears out of focus ("Soft focus on face").
On/off plus a Blur Sensitivity slider — higher flags more photos as soft, lower only flags very blurry shots.
Exposure Check
Photos that look significantly over- or underexposed.
On/off.
Crop Guide
Draws corner framing guides on the preview and flags faces near the edge of frame ("Face near edge of frame").
On/off plus a Guide Inset slider controlling how far from each edge the guides sit.
Show All Face Boxes
Not a check — outlines every detected face on the preview instead of only problem faces.
On/off.
Offending faces are outlined on the Capture preview so you can see exactly which face triggered the flag. Use Recheck Quality on Capture to re-run the analysis after changing settings.
All of these live in Settings → Photo Quality, and each field may be pre-configured per event by PathKey (shown with a From PathKey caption). The same section holds the marker photo controls.
"Possible Blink" means possible
The checks are prompts to take another look, not verdicts. A flagged frame can be fine, and an unflagged one can still be problematic. When the notice appears, take a moment to decide if you need a retake.
Upload States
Photos are held locally while their assignment is still active on this device, so last-second retags, deletes, and print decisions don't have to fight the uploader. As soon as you complete the assignment, its photos advance through the upload pipeline automatically in the background.
These states describe one photo's trip to the server. Whether the assignment will print is a separate question with its own answer — see Assignment Batches. Every photo in an assignment can read Uploaded and the assignment can still need your attention.
State
When you see it
What to do
Held Locally
The photo's assignment is still active on this device (or the photo is untagged).
Nothing - this is normal. It moves to Queued when you complete or switch away. You can also force it with Retry / Retry All on the Session tab.
Queued Upload
Waiting for the background uploader.
Nothing. Uploads run automatically whenever a connection is available. Cancel returns it to Held Locally.
Uploading
In flight right now — the Session tab shows a live progress bar. "Waiting for server confirmation" means the bytes are up and the server is finishing.
Keep the phone online. Large JPEGs over weak Wi-Fi can take a while.
Uploaded
Server confirmed receipt.
Nothing. The photo's tag and print flag are now settled — Capture goes read-only for it and the Gallery hides it by default. Don't delete uploaded photos to free space while the event is still running; if its batch later needs a retry, the photos have to still be here.
Upload Failed
The upload errored after retries. The Session tab shows the error text and attempt count.
Failed photos retry automatically when the network comes back; you can also tap Retry. If it stays failed, see Troubleshooting.
What triggers a queue
Photos queue when their assignment stops being your active assignment: tapping Complete, marking No Photos, or moving to a different assignment. Retagging a photo onto an assignment that is already completed also queues it immediately. Untagged photos stay held until they're tagged (or manually retried).
"Uploaded" is not the same as "will print"
Individual photos can upload successfully while the assignment's batch still fails to register with the print station. The upload badges won't tell you about that; the red banner on the Path tab will. Check Path before leaving, not the Uploads card.
Assignment States
How assignments read on the Path tab:
State
Meaning
ACTIVE
The assignment your device is tagging photos with right now. One at a time per device, and device-local — it doesn't claim anything for anyone else.
YOURS
Open and assigned to you (the Your Assignments section).
OPEN
Unassigned. Anyone can Assign to Me or simply activate and shoot it.
RETURN
Someone requested another pass. Higher priority than normal; the row shows the reason when one was given.
SKIP
Operations says do not disturb. The app shows red warning styling if you activate one anyway. Completing a skipped assignment clears the flag.
NO PHOTOS
Completed with a "nothing to shoot" flag. The flag clears automatically if a photo is later retagged or uploaded onto the assignment.
DONE
Completed — shows who completed it and when. Its photos are frozen into a batch and on their way to the print station. Can be reopened if work reappears.
WILL NOT PRINT
Completed, but the batch never reached the print station. Shown as a red banner above the list, not as a row badge. Needs action from you — see "Will Not Print" Warning.
One row can carry more than one of these: a returned assignment you've reopened is both RETURN and ACTIVE while you reshoot it.
Advanced & Admin
The rest of this manual is for operators, shift leads, and admins. Most photographers don't need to touch it day-to-day.
Transfer Session
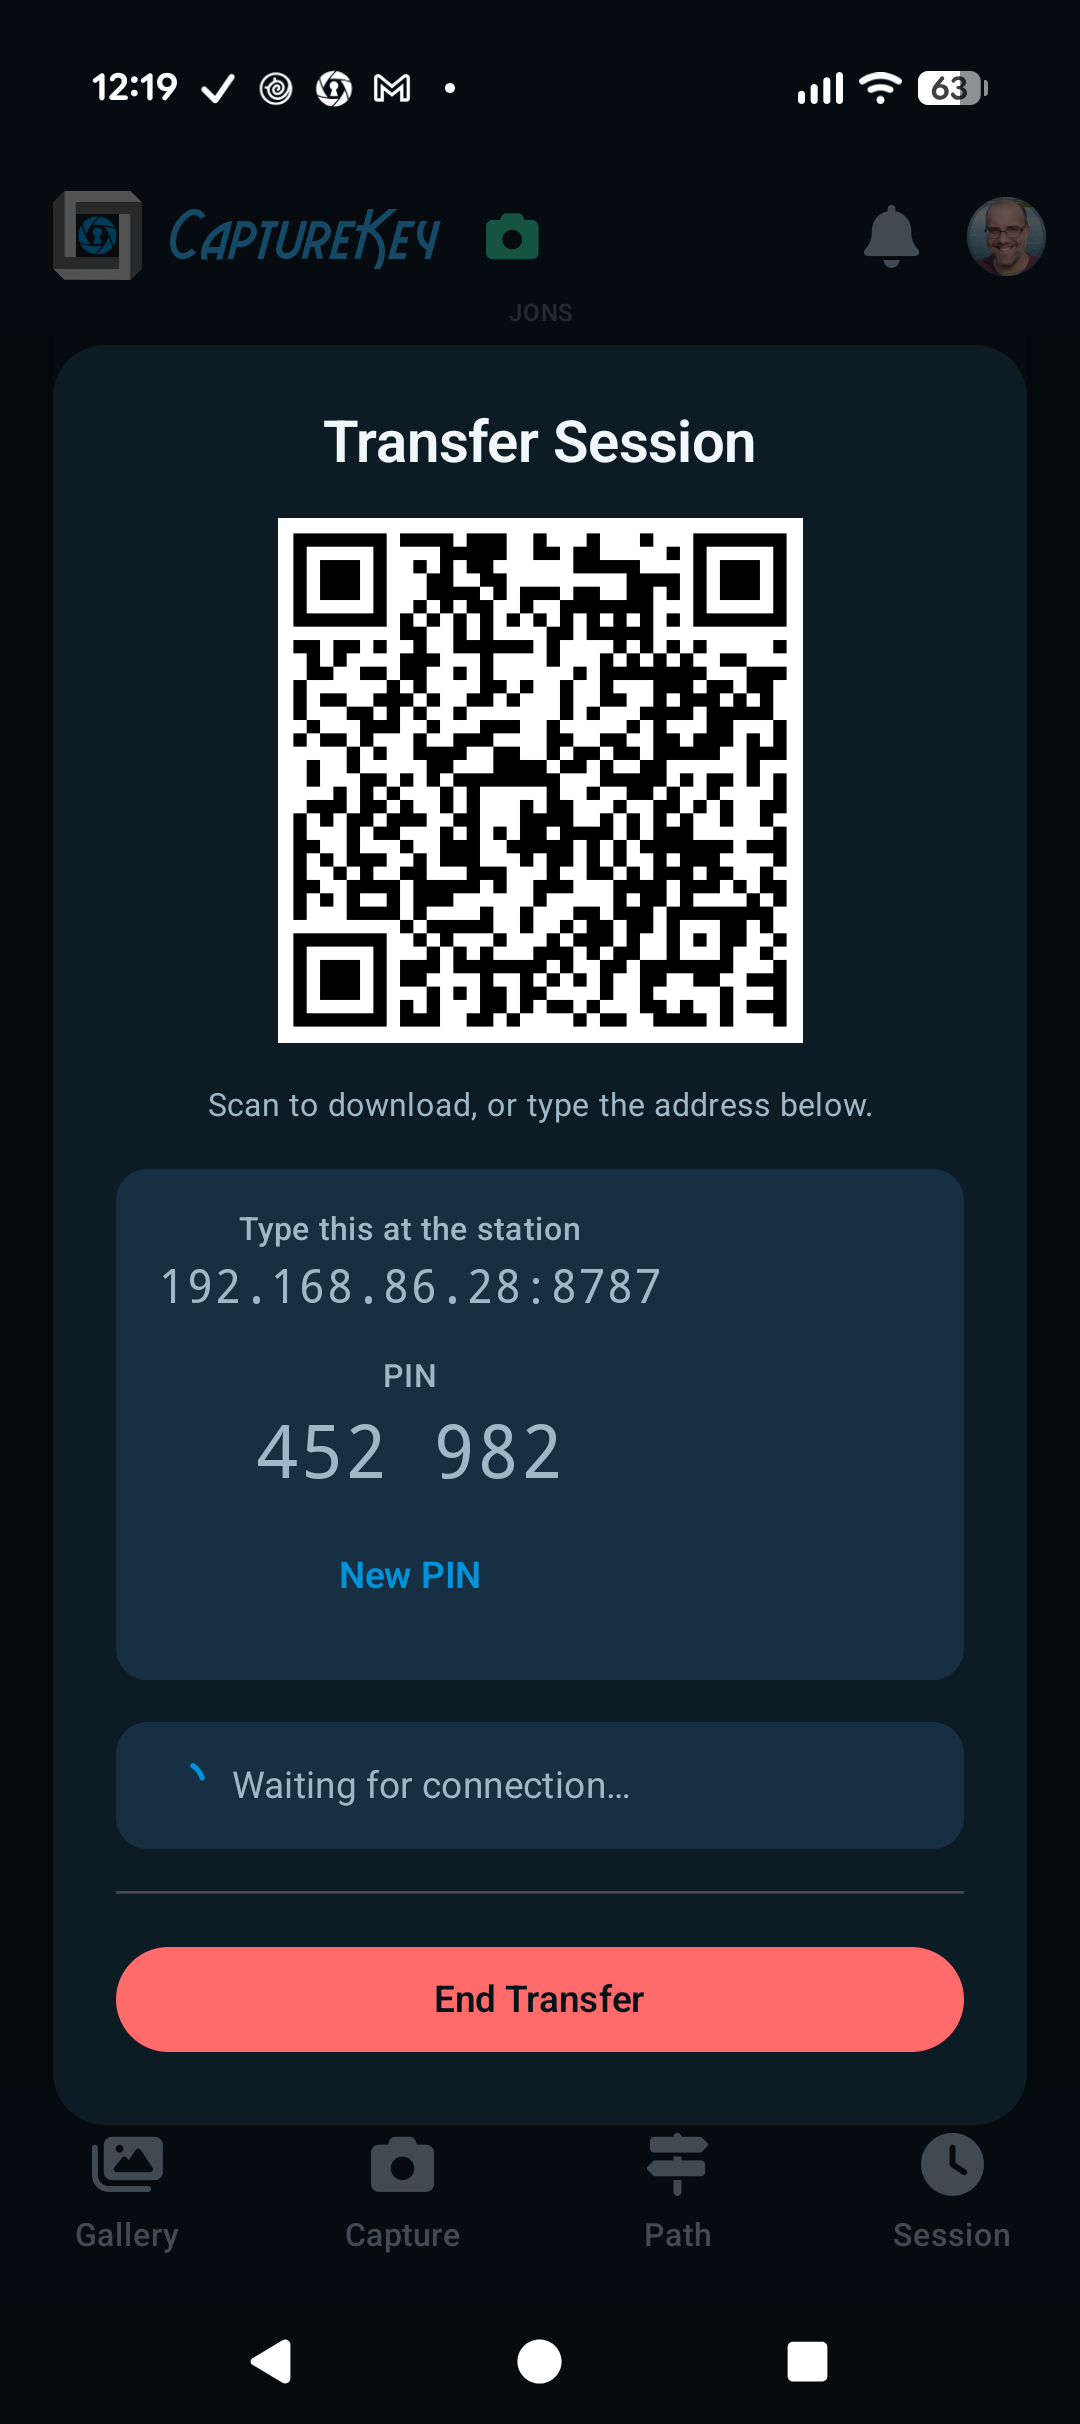
Export Session on the Session tab packages the device's session — a manifest plus every imported photo — and hands it to a print station directly, without going through the server. Photos remain on this device; a transfer copies, it doesn't move.
12345
Download QR code - Scan the QR code to connect to the transfer session.
Address to type at the station - Enter this address manually if scanning is not possible.
Transfer PIN - Enter this PIN to authenticate the transfer.
Connection and transfer status - Monitor the progress of the transfer.
End Transfer - Conclude the transfer session when complete.
The opening screen offers two routes, plus the approximate size of the bundle so you can judge whether a drive has room:
Send over Wi-Fi
Make sure the print station is on the same network — connect it to this phone's hotspot, or put both on the same Wi-Fi. The dialog has a shortcut to the phone's Hotspot / Wi-Fi settings.
Tap Send over Wi-Fi. The phone starts a small local web server and shows a QR code, the address to type at the station, and a PIN.
At the station, scan the QR or type the address, then enter the PIN. The dialog confirms Station connected.
Watch progress: waiting → transferring with a percentage → complete, with a count of how many times the bundle has been downloaded.
Tap End Transfer when done. The dialog blocks accidental dismissal — the server keeps running until you end it.
The PIN pairs the station to this phone so a stray device on the same network can't pull the session. After too many wrong attempts the PIN locks and the dialog offers New PIN; you can also issue a fresh one at any time. If the phone has no usable network address, the dialog says so — connect to the station's Wi-Fi, then end and restart the transfer.
If a transfer is interrupted, just rescan and retry.
Save to File
When there's no shared network, tap Save to File and pick a destination — a USB drive, an SD card, or the phone itself — then carry it to the station. The dialog shows the approximate size beforehand, because the free space on a plugged-in drive can't be read through Android's file picker; you're the one who has to judge whether it fits. No PIN is involved.
Normal photo retrieval doesn't need this
Uploaded photos are stored on the server per event and pulled from there by SolidKey for fulfillment. Transfer Session is for the direct, venue-local handoff case — e.g. an on-site print station with no internet path to the server.
SMID
The SMID is the Shatterproof Media ID label for this device. It rides along with every uploaded photo and the end-of-session summary so Operations can trace which phone shot what. The camera body has its own SMID, resolved server-side from the inventory system by camera serial number.
Ways the device SMID is displayed:
In-app readout - Small text under the top bar, always visible while signed in.
Home-screen widget - Shows the SMID large, with buttons to display it as a QR code and to open this manual. Add it from Settings → Admin (Add SMID widget to home screen) or from the launcher's widget picker.
Persistent notification - A silent, ongoing notification shows the SMID even when the app is closed. Requires notification permission.
Editing: only admin/super accounts see Settings → Admin, where the SMID can be changed (1-10 uppercase letters, numbers, underscores, or dashes). It is a device/app setting — it survives logout and event changes.
Diagnostics
A read-only Diagnostics page from Settings → Diagnostics. It's the place to look when something needs explaining rather than fixing, and it's the fastest way to give Operations a precise answer instead of "it didn't work."
Six tabs:
Session - The local session as the device understands it: event, photographer, active assignment, counters.
PathKey - The event configuration received from the server, including which quality fields it is setting.
Uploads - Per-photo upload state and per-assignment batch status, color-coded — red for a batch that will not print, green for one the server has confirmed. This is where to confirm whether an assignment actually landed.
Raw JSON - The underlying state document, selectable for copying into a bug report.
Storage - What the app is holding on disk.
Camera - The connected body's identity and the last PTP probe. Run a probe here when a camera is misbehaving.
Nothing on this page changes anything. It's safe to browse mid-event.
You can check manually any time: tap the logo → Check for Updates in the About dialog.
When an update is found, Download & Install fetches the APK and hands it to the Android installer. The install prompt is the normal system dialog.
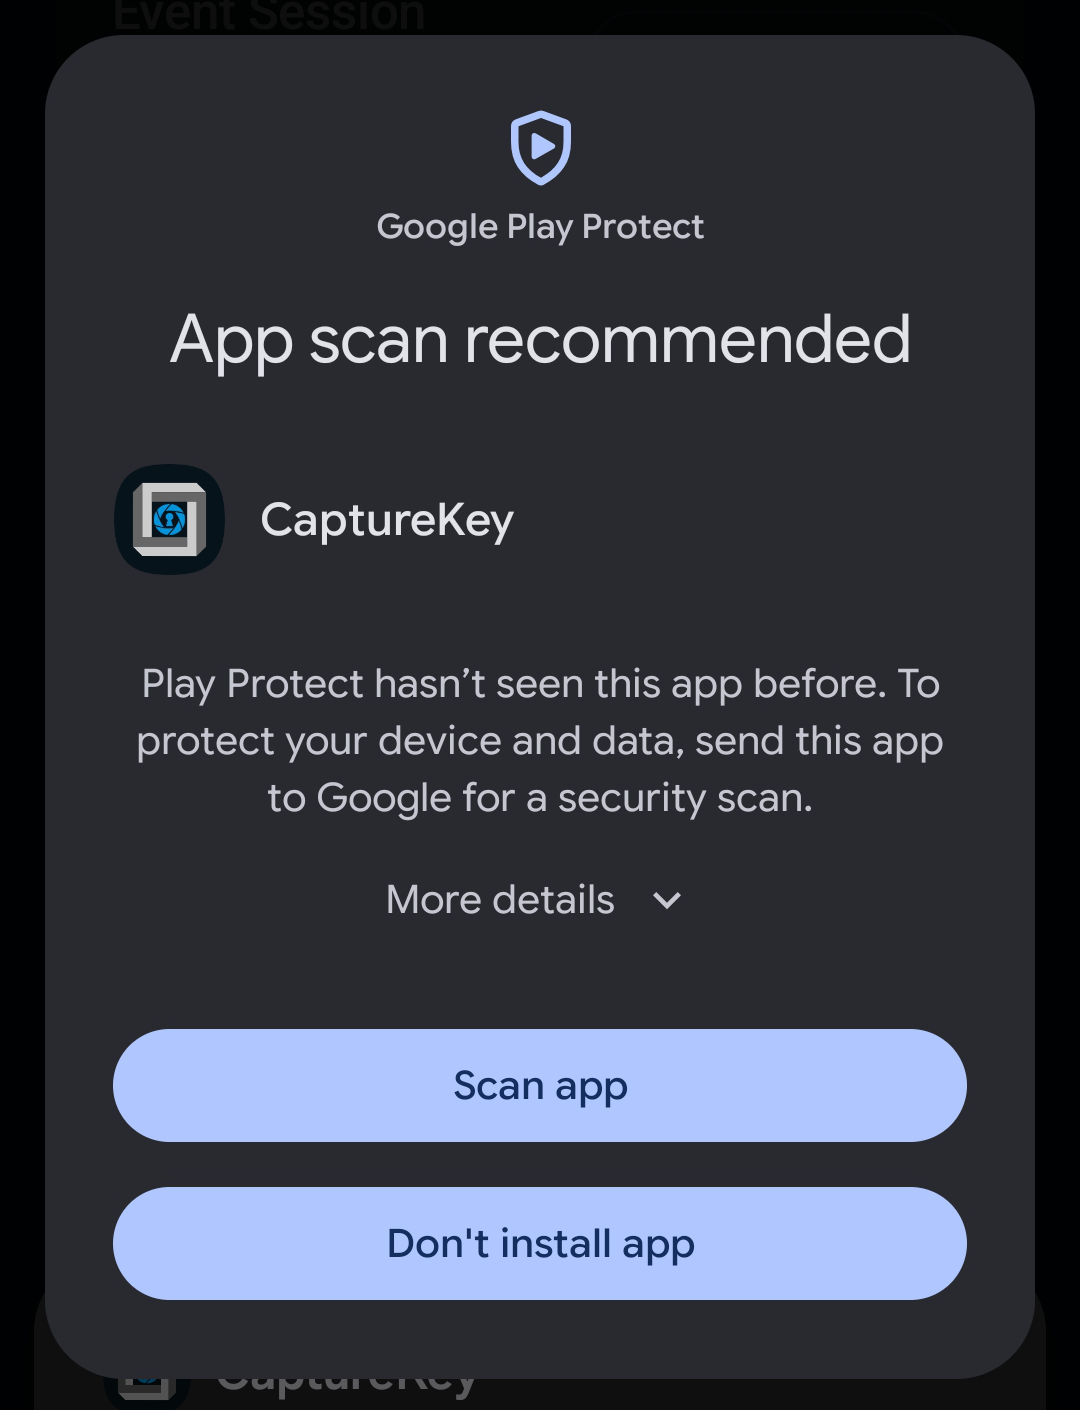
"App scan recommended"
Because CaptureKey is installed from PortalKey rather than the Play Store, Google Play Protect often stops the install with an App scan recommended dialog. This is expected and does not mean anything is wrong with the build.
Do not tap Scan app or Don't install app. Instead:
Tap More details to expand the dialog.
Tap Install without scanning.
The install then continues as normal. The prompt usually only appears the first time a device sees a given release.
Mandatory updates
A release can be flagged mandatory on the server. When the app detects one, the update dialog opens non-dismissably — the app cannot be used until the update is installed. Failed downloads offer Retry.
The installed app must be signed with the same key as the downloaded APK or Android rejects the install — relevant only if a device somehow ended up with a debug-signed build.
Sync & Conflict Rules
Multiple photographers touch the same event at the same time. CaptureKey's model keeps things predictable:
Active is device-local. Two devices can have "the same" assignment active. Each only tags the photos it sees.
Complete is event-global, last write wins. The server records whoever completed it most recently. Completing also clears any skip flag and any pending return request on the row.
Assign to Me wins the row. Reassignment replaces the previous owner, even if the row was already on someone's list. Last write wins; there's no locking at event scale.
No Photos clears on new photo. If a photo is uploaded or retagged onto a No Photos assignment, the flag drops automatically. The assignment stays completed unless someone reopens it.
Reopen takes ownership. Reopening a completed or returned row also assigns it to whoever reopened it.
Skip is operator-managed. Operations sets and clears Skip through PathKey. Photographers see the red warning but can shoot it if instructed.
Local writes are optimistic. Actions apply instantly on your device and sync to the server through an outbox in the background. Your own pending changes are overlaid on the server data so they always appear applied.
Refresh protects your outbox. When the server has newer data but this device still has unsynced changes, a banner appears and the app waits instead of refreshing over them. A manual pull-to-refresh in that state asks for confirmation first.
Canon Camera Notes
CaptureKey talks to Canon EOS bodies directly over USB using MTP plus the Canon EOS event stream (a native libusb/PTP layer handles what Android's MTP API can't). Tested bodies include the R100 and the T5i. Other recent EOS bodies should work but may need a firmware check.
Compatibility notes
Canon R100 - Works.
Canon T5i - Works, with broadened handling for older Canon EOS event variants. If the status says "Listening" but no captures arrive, power-cycle the camera and reconnect.
Other EOS bodies - Generally fine. If a specific body misbehaves, expand the Camera card on the Session tab, note the camera name / stable ID / USB IDs shown there, and send them to Operations.
Missed shots and clock sync
Two things the app does quietly, worth knowing about:
Missed-shot sweep - After a connection drops and returns, the app re-reads the card looking for frames it never received, and imports them. A shot fired during a brief disconnect usually finds its way in on its own. If it lands after you completed the assignment, though, it is tagged to whatever is active then — check the Session Activity log and retag if needed.
Clock synchronization - On connect, CaptureKey sets the camera's clock from the phone. This keeps capture timestamps consistent across every photographer's bodies, which is what downstream ordering relies on. Don't be surprised to see the camera's time change on connect.
Capture destination
Leave the camera set to write to its SD card. CaptureKey pulls copies. Writing to the card keeps a physical backup and is faster on tethered bursts than writing over USB.
Delete from card
If you turn Delete From Card After Import on (Session tab → Camera card), the app deletes each successfully imported photo from the card. This only runs after CaptureKey has the file and has registered it for upload. It does not run on failure.
Offline Behavior
Events often happen in venues with bad Wi-Fi. CaptureKey is local-first:
All workflow state is persisted on the device, scoped to your photographer and event. Camera capture, import, tagging, and quality checks work with no connection at all.
Every event-global change you make (completes, retags, notes, no-photos, returns) is queued in an outbox and synced to the server in the background. The Session Activity log reports each sync as it lands.
Photo uploads are handled by Android's WorkManager: when the device is online it drains the queue; when it's not, it waits. Failed uploads retry automatically the moment a network connection returns.
Nothing needs to be pressed when the network comes back — outbox actions and uploads both resume on their own.
Troubleshooting
Camera / USB
If the camera icon is red, open the Session tab, expand the Camera card, and tap Connect. The status line under the buttons says what the app is waiting on.
Unplug and replug the cable — phone end first, then the camera end.
Power-cycle the camera. Canon bodies sometimes need a full off-on after the USB permission dialog is dismissed.
If Android keeps popping the USB permission dialog, check Always allow / Use by default.
Swap to a known-good USB cable. Charge-only cables will not work.
If the camera name reads wrong or "Unknown" on the Camera card, screenshot the card (it includes the stable ID and USB IDs) and send it to Operations.
If the banner over the preview reads Transfer failed, the shot did not make it across. Fire the frame again rather than assuming it will turn up; the banner stays put until dismissed precisely so it isn't missed.
If a shot never appears at all, check the banner first. Reading card on a full card can take a while after connecting, and Transferring (+n waiting) just means you're shooting faster than USB is draining.
Uploads stuck
Confirm the phone actually has a data connection. Wi-Fi drops can hide.
Open the Session tab's Uploads card. It shows exactly which photos are in which state, plus the last error and attempt count for failures.
Failed uploads retry automatically when connectivity returns; Retry All forces it immediately.
A single Upload Failed photo does not block the others. Several failing in a row usually means a connectivity or account problem — check the error text.
If photos sit in Queued for minutes on a good connection, toggle airplane mode off and on. Android occasionally pins background work to an unavailable network.
Photos showing Held Locally under an assignment you finished usually mean the assignment is still active — complete it or clear the active assignment on Path.
As a last resort, sign out and sign back in. Local photos, tags, and pending sync actions survive sign-out.
Printing
Red "will not print" banner on Path. Tap Retry Upload first — it's the whole fix when an upload never started, and it can't create a duplicate. Only if a retry doesn't clear it should you consider Give Up, and read which of the two dialogs you get: if it says the print station has no record, ask the print operator before reshooting. See "Will Not Print" Warning.
A photo you wanted didn't print. Check whether it was marked Don't Print — flagged photos are dimmed in the Gallery, and the flag shows in Image Data. The close-out sweep flags people-less photos by default, so an intentional empty-room shot needs ticking during that dialog.
A photo you didn't want did print. Once a batch is frozen and uploaded, the device can't take it back. Tell Operations.
End Session says photos "are not in a batch yet." Those photos belong to no completed assignment and would never reach the print station. Find them in the Gallery, tag them to the right assignment, and complete it.
You completed the wrong assignment. Reopen it from Path (this also assigns it to you), shoot or fix what's needed, and complete it again. Reopening does not un-send the first batch — if photos already uploaded under the wrong suite, say so to Operations.
Before you leave any event: Path tab shows no red banner, and End Session confirms with no blockers. Those two checks catch essentially everything.
Sync / Data
If Path looks stale, pull down to refresh. If a banner says a refresh is waiting on unsynced changes, give the outbox a few seconds to drain (watch Session Activity) and try again.
If two photographers appear to have the same assignment active, that's expected — active is device-local.
If a No Photos flag disappeared from an assignment, someone retagged or uploaded a photo onto it. That's by design.
Never clear the app's data in Android settings during an event — it deletes the outbox and un-uploaded photos along with everything else. If something seems wrong, call Operations first.
General
Keep the phone plugged in or on a battery pack. Tethered capture drains battery quickly — the Dim When Idle setting helps stretch it.
Turn on Lock Rotation if the UI keeps flipping when you hand the phone around.
Marker photos aren't being read. Fill more of the frame with the number and keep it square-on. If it still misses, lower Marker Text Size in Settings → Photo Quality. If detection isn't offered at all, the event has it turned off — that's Operations' call.
Ordinary photos are being mistaken for markers. Raise Marker Text Size so background signage falls below the threshold, and tap Print This on any photo wrongly caught.
The completion dialog keeps appearing when you didn't mean to complete. Answer it (both buttons complete), then reopen the assignment from Path. There's no way to back out of that dialog by design.
For persistent issues, note the photographer username, event name, assignment number, and approximate time, then send it to Operations. The device's SMID (under the top bar) and the Session Activity log help the server side pick up the thread.
About CaptureKey
CaptureKey is part of the Shatterproof Media KeyRing. It plugs into the same PortalKey backend as PathKey, SolidKey, and SiteKey, so photographer identity, event data, and media retrieval all stay in one place: PathKey configures events and assignments, CaptureKey shoots them, and SolidKey pulls the uploaded photos for fulfillment.
This app is actively developed. If something feels off or could be faster, tell Operations - nothing about the workflow is set in stone.

 1
2
3
4
5
6
7
8
9
10
11
1
2
3
4
5
6
7
8
9
10
11